

The Secret to Ultra Soft and Stretchy Homemade Garlic Naan
Prepare to elevate your Indian dining experience with homemade Garlic Naan that’s not just good, but truly extraordinary. This viral recipe, honed over two decades alongside my Indian husband, guarantees impossibly soft, delightfully stretchy naan that rivals any restaurant. Forget dry or tough flatbread; this recipe will become your go-to for perfectly puffed, tender, and aromatic garlic naan every single time.

This garlic naan is more than just a side dish; it’s an essential companion for soaking up rich curries, scooping up savory gravies, or simply enjoying on its own. It takes everything you love about Butter Naan and infuses it with irresistible garlic flavor, transforming your meal from good to truly gourmet. With over 12 million views, this recipe isn’t just popular—it’s a proven crowd-pleaser that will revolutionize your home cooking.
Essential Ingredients for Your Perfect Garlic Naan
Making the best garlic naan starts with a few simple pantry staples. Gather these ingredients, and you’re well on your way to creating a culinary masterpiece that will impress everyone at your table.
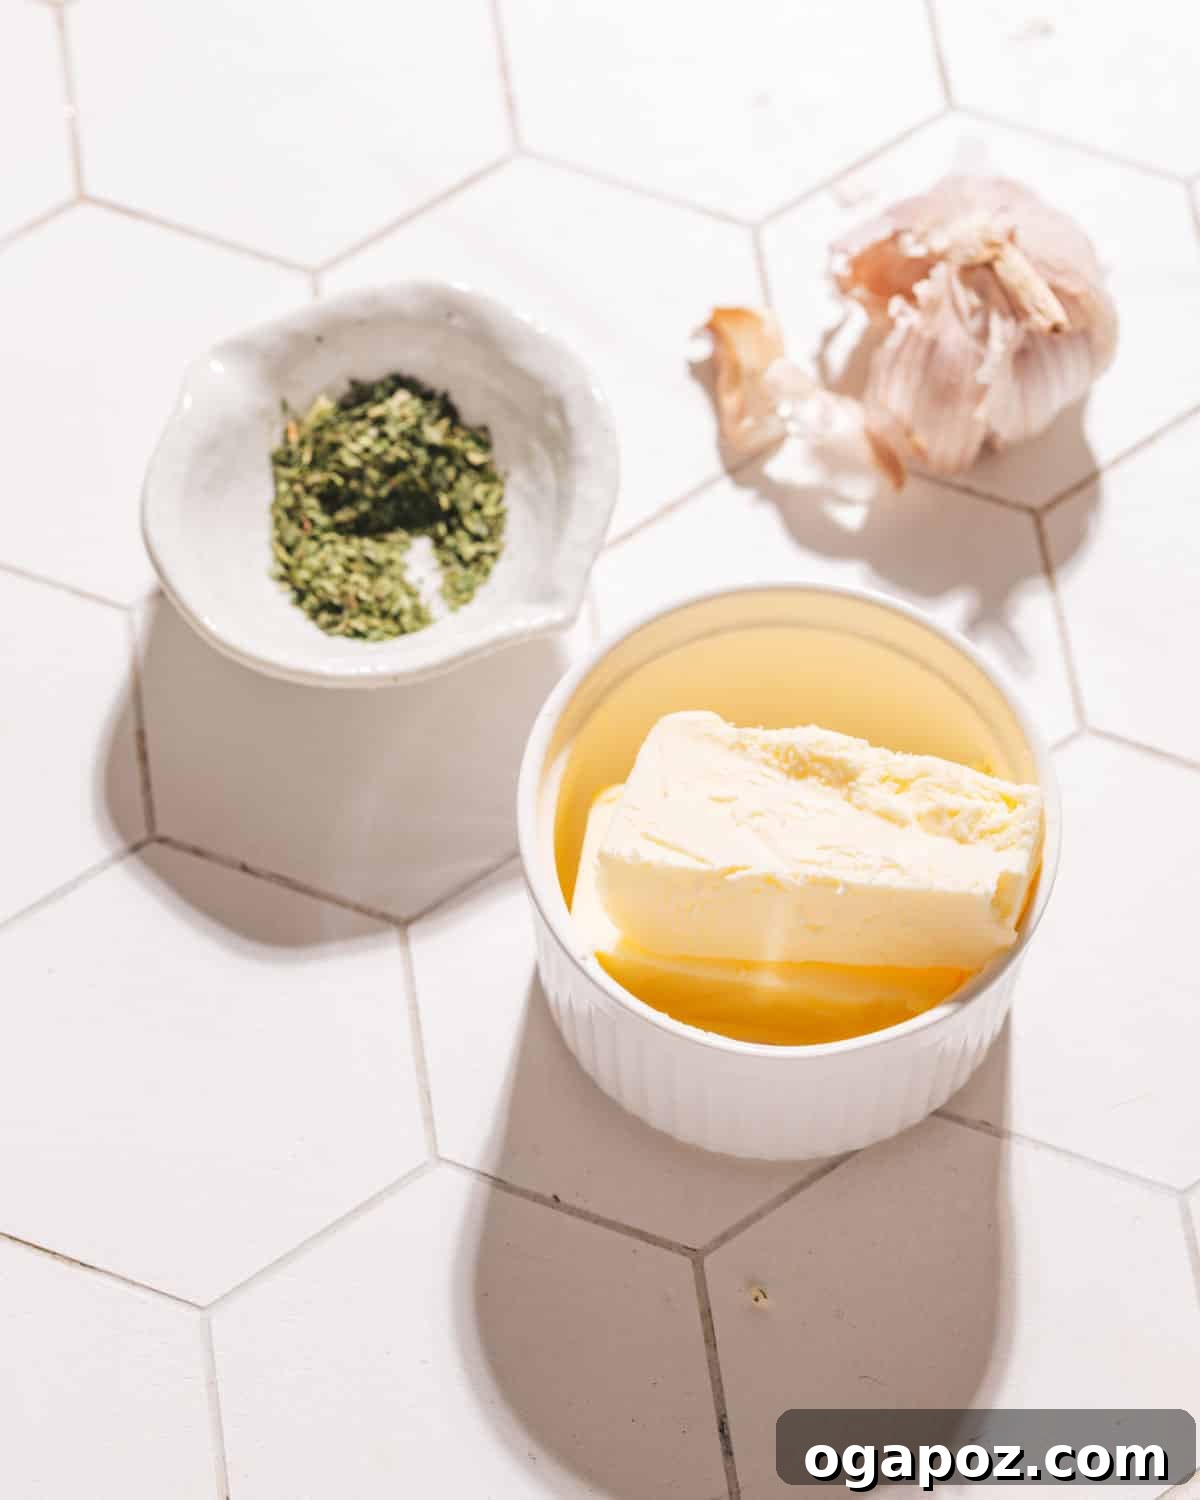
What You’ll Need for the Dough and Topping
Here’s a detailed look at the ingredients and why they are crucial for achieving that signature soft and stretchy texture:
- All-Purpose Flour: The foundation of our naan. While some recipes suggest bread flour, all-purpose flour provides the perfect balance of structure and tenderness when combined with our leavening agents.
- Instant Dry Yeast: This is the magic ingredient that gives naan its characteristic airy, bubbly texture. Ensure your yeast is fresh; old yeast won’t activate properly, leading to dense naan. Instant yeast is convenient as it can be mixed directly with dry ingredients without prior proofing.
- Kosher Salt: Enhances the flavor of the dough and regulates yeast activity. Don’t skip it!
- Baking Powder and Baking Soda: You might wonder if both are necessary, and the answer is a resounding YES! These two leavening agents work in tandem. Baking powder provides an initial lift, while baking soda reacts with the yogurt’s acidity, contributing to the naan’s incredibly light and fluffy internal structure and beautiful surface bubbles. This combination is essential for that “melts in your mouth” quality.
- Plain Yogurt or Buttermilk: This is a secret weapon for softness. The acidity in yogurt (or buttermilk) tenderizes the gluten in the flour, resulting in a much softer and more pliable dough. It also reacts with the baking soda for extra lift. Unflavored plant-based yogurt can be used successfully for a dairy-free alternative.
- Warm Water: Activates the yeast and helps bring the dough together. Ensure it’s warm (around 105-115°F or 40-46°C) but not too hot, which can kill the yeast.
- Unsalted Butter: Adds richness and flavor to the dough, contributing to its softness. It’s also melted and brushed over the hot naan after cooking, infusing it with a glossy finish and delightful buttery taste.
- Fresh Garlic: The star of garlic naan! Freshly minced garlic is far superior to bottled or powdered garlic in this recipe, delivering a vibrant, pungent aroma and flavor that’s incomparable.
- Fresh Cilantro (Optional): A classic garnish for Indian breads, fresh cilantro adds a touch of freshness and a beautiful green fleck. If you’re not a fan, you can omit it or swap it for parsley for a different flavor profile, making it a great alternative to traditional garlic bread for Italian meals.
Creative Variations for Your Naan
Once you master the basic recipe, feel free to experiment with these delicious variations:
- Butter Swaps: For an even richer, nutty flavor, substitute ghee (clarified butter) for regular butter. For a dairy-free version, high-quality non-dairy butter alternatives work wonderfully.
- Herb Alternatives: While fresh cilantro is traditional, if unavailable or not preferred, you can use dried cilantro (as shown in some recipe demonstrations) or even fresh parsley for a different, yet equally delicious, herby touch. This makes it a fantastic accompaniment to a variety of cuisines.
- Yeast Flexibility: If you only have active dry yeast, you can still make this naan! Just remember to proof it first: combine the yeast with the warm water (and a pinch of sugar, if desired, to “feed” the yeast) and let it sit for 5-10 minutes until foamy, then add it along with the yogurt to the dry ingredients.
- Gluten-Free Naan: For those with dietary restrictions, many home cooks have reported excellent results using a good quality all-purpose gluten-free flour blend. Adjust water slightly if needed, as GF flours can absorb liquid differently.
- Cheese Naan: For a decadent twist, sprinkle shredded mozzarella or a mix of cheeses onto the rolled-out dough before cooking. Fold it in half or top with another layer of dough and seal the edges before cooking.
Essential Tools for Naan Making
Having the right kitchen tools makes the naan-making process smooth and enjoyable:
- Stand Mixer with Paddle and Hook Attachments: While not strictly essential (you can knead by hand!), a stand mixer greatly simplifies and speeds up the dough mixing and kneading process, ensuring consistent results. The paddle attachment is for initial mixing, and the hook for kneading.
- Cast Iron Skillet: The secret to achieving that authentic tandoor-like char and puff at home. A heavy cast iron skillet retains and distributes heat exceptionally well, mimicking the high temperatures of a traditional clay oven.
- Rolling Pin: For evenly rolling out your naan dough.
- Parchment Paper: Useful for preventing sticky dough from adhering to surfaces during rising.
- Tongs: Essential for handling hot naan on the skillet and over a flame (if using the direct flame method).
Mastering Homemade Garlic Naan: A Step-by-Step Guide
Follow these detailed steps to create perfectly soft, bubbly, and flavorful garlic naan every time. This authentic Indian naan bread recipe is designed for flawless results.
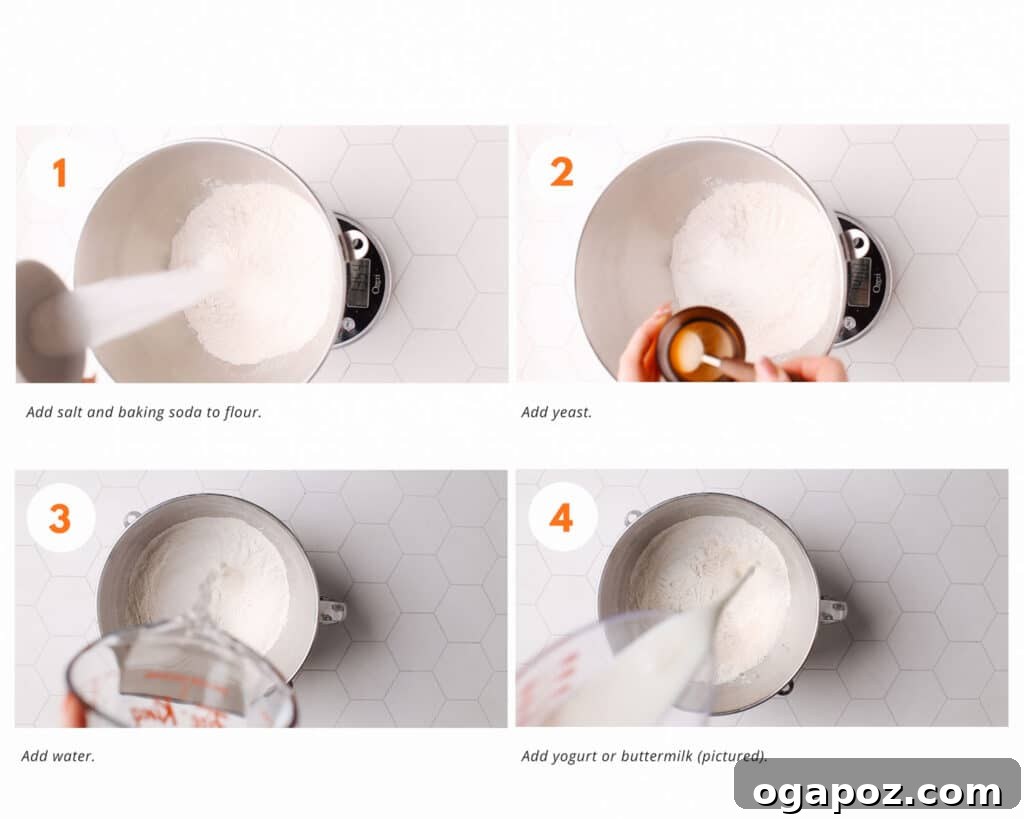
Step 1: Combine Dry Ingredients
In the bowl of a stand mixer, fitted with the paddle attachment, measure out 4 cups of all-purpose flour. Add 1 tablespoon of instant dry yeast, 2 teaspoons of kosher salt, 1 teaspoon of baking powder, and ½ teaspoon of baking soda. Mix these dry ingredients on low speed for about 30 seconds to ensure they are thoroughly combined. This even distribution is vital for uniform rising.
Step 2: Incorporate Wet Ingredients
To the dry mixture, add ¾ cup of plain yogurt (or buttermilk) and 1 cup of warm water. Start mixing on low speed. The dough will appear shaggy and somewhat sticky at this stage, but don’t worry – it’s supposed to look like that.
Step 3: Knead the Dough to Perfection
Switch from the paddle attachment to the dough hook attachment. Increase the mixer speed to medium-low and knead the dough for a full 4 minutes. Initially, the dough will be quite sticky and may cling to the sides of the bowl. Resist the urge to add more flour unless it’s absolutely unmanageable. As it kneads, the dough will gradually become smoother, more elastic, and will start to pull away from the sides of the bowl. The stickiness is key to its ultimate softness.
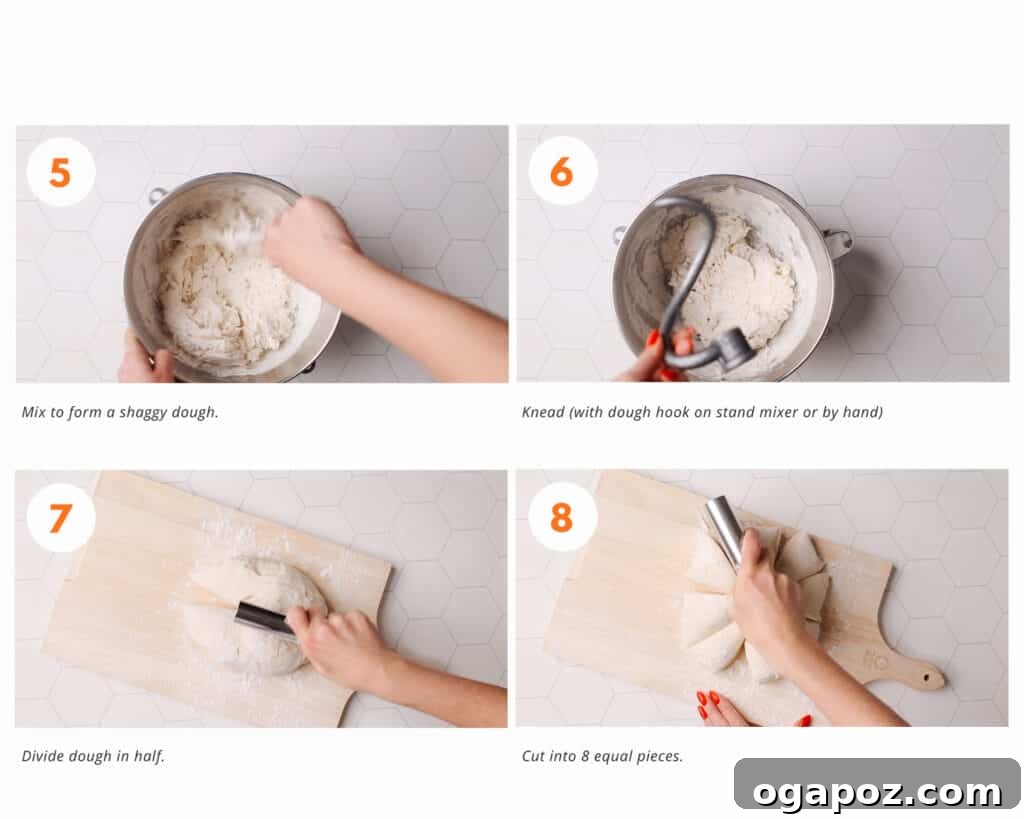
Step 4: Divide and Shape the Dough Balls
Generously flour your clean work surface. Carefully turn the sticky dough out onto the floured surface. Sprinkle a little more flour over the dough and briefly knead it by hand to form it into a large, cohesive ball. Using a sharp knife or dough cutter, divide this large ball into 8 equal portions. Roll each portion into a smooth, round ball. If the dough is too sticky to handle comfortably, lightly dampen your hands with water or add just a touch more flour to your hands, not directly to the dough, to help with shaping. Avoid over-flouring the dough itself, as this can make the naan tough.
Step 5: The First Rise for Flavor and Texture
Take a sheet of parchment paper and lightly oil it. Place your dough balls onto the oiled parchment, then gently roll each ball around to coat it in the oil. This prevents a hard crust from forming. Cover the dough balls with another piece of parchment paper or a clean kitchen towel. Place them in a warm spot in your kitchen and let them rise for 1 hour. During this time, the dough will become visibly larger and softer, developing flavor and elasticity.
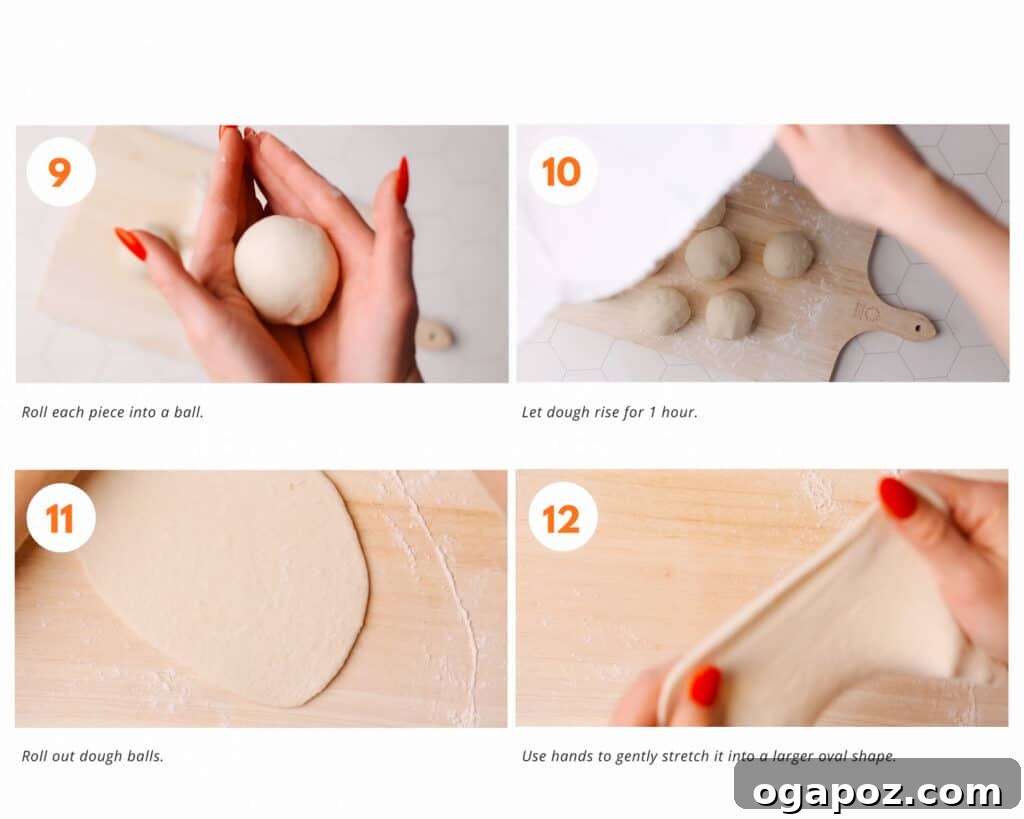
Step 6: Roll and Rest the Naan
Once the dough has risen, lightly flour your work surface again. Take one dough ball and, using a rolling pin, roll it out to approximately ¼ inch thick. You want an oblong or teardrop shape, typical of naan. Flour your rolling pin and the dough lightly as needed to prevent sticking, but be conservative with the flour. After rolling, gently stretch the dough further with your hands to achieve a slightly thinner, more elongated shape. Arrange the rolled naan pieces in a single layer (without overlapping) and let them rest for an additional 10 minutes. This short rest allows the gluten to relax, making the naan easier to cook and contributing to its soft texture.
Step 7: Preheat and Cook the Naan
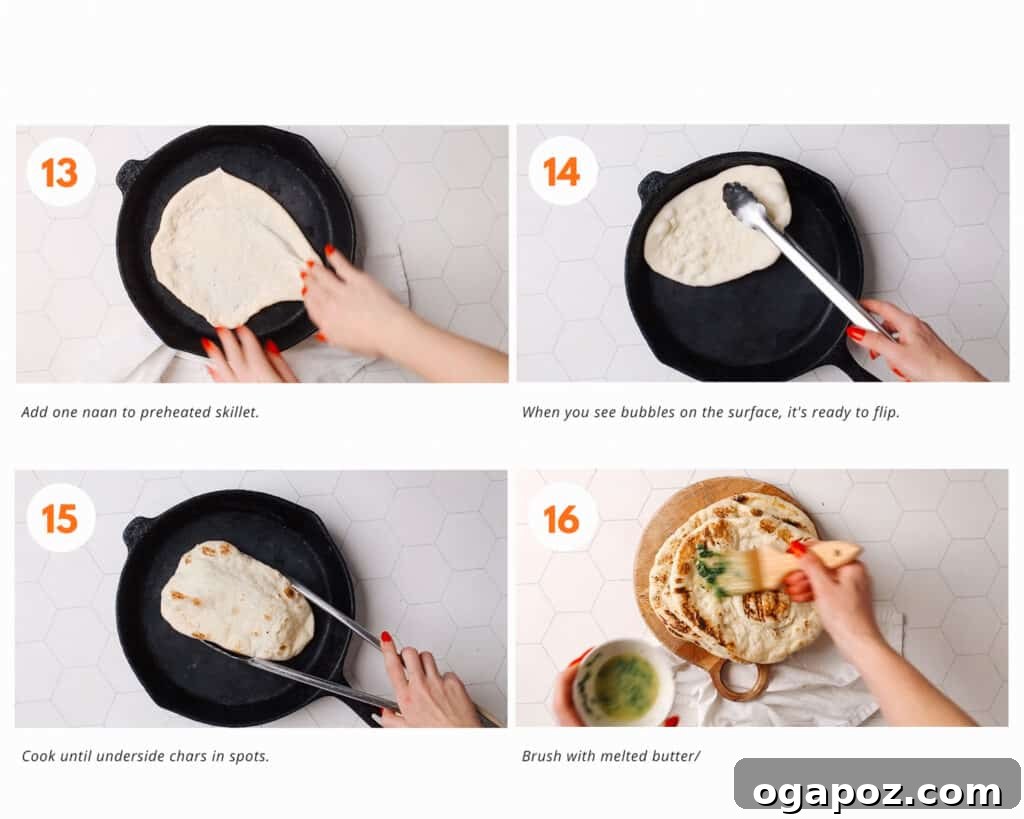
While your naan rests, place a cast iron skillet over medium-high heat and let it preheat for at least 5 minutes. This is crucial for mimicking a tandoor’s high heat. To test if it’s hot enough, sprinkle a few drops of water onto the pan; if they sizzle immediately and evaporate, your skillet is ready. Carefully place one rolled naan into the hot, dry skillet. Cover the skillet with a lid and cook for 30-60 seconds, or until visible bubbles form across the surface of the naan. Remove the lid, flip the naan, and cook for another 30 seconds to 1 minute, or until it starts to develop beautiful charred spots and loses its raw doughy appearance. The high heat creates that signature puffiness and slight crisp exterior with a soft interior.
Step 8: Brush with Garlic Butter
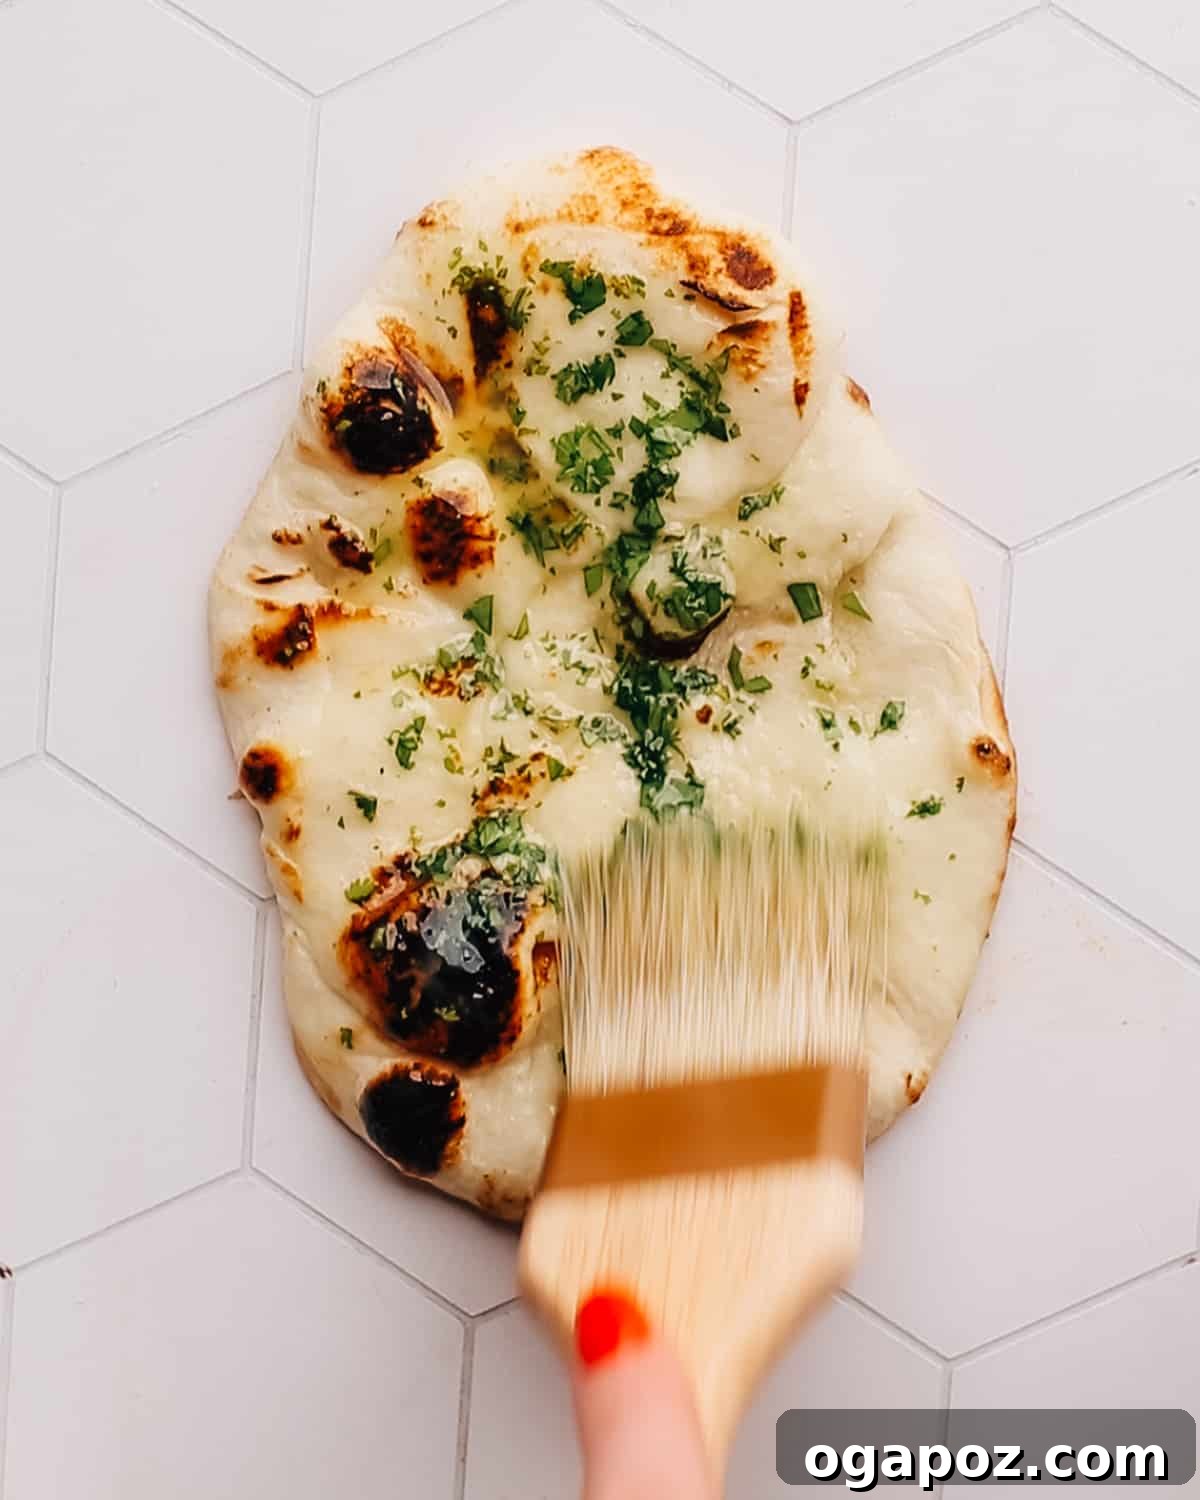
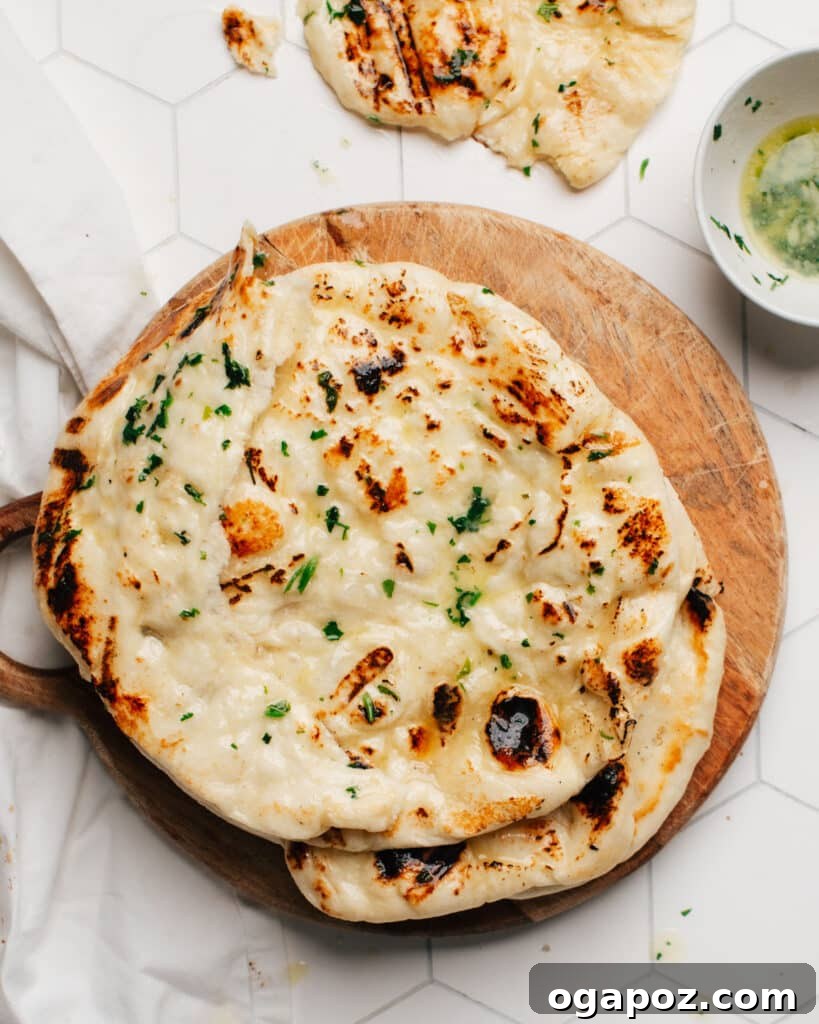
As each naan finishes cooking, immediately transfer it to a plate and cover it with a clean kitchen towel. This keeps the naan warm and helps it retain moisture, staying incredibly soft. In a small bowl, mix 4 tablespoons of melted butter with 4 cloves of freshly minced garlic. If using, stir in 1 tablespoon of minced cilantro. Generously brush each warm naan with this aromatic garlic butter mixture. The butter will soak into the hot bread, infusing it with flavor and ensuring maximum deliciousness and moisture.
Avoid These 4 Common Mistakes for Perfect Naan
Even experienced bakers can sometimes stumble. Steer clear of these common pitfalls to ensure your homemade garlic naan turns out perfectly soft, stretchy, and delicious every time.
- Inadequate Resting Time: Rushing the dough’s resting periods is a common mistake. Allowing the dough to rest, both after kneading and after rolling, is absolutely essential. This time allows the gluten to relax, making the dough easier to work with, stretch, and preventing it from shrinking back. Shortening or skipping these resting times will result in a tougher, less soft, and less pliable naan that lacks its characteristic stretchiness. Patience is a virtue in naan making!
- Improper Skillet Preheat: The temperature of your cooking surface makes all the difference. Many home cooks don’t preheat their cast iron skillet thoroughly enough. A blazing hot skillet is crucial for replicating the high temperatures of a traditional tandoor oven. This intense initial heat causes the dough to puff up rapidly, creating those iconic bubbles and charred spots. If the skillet isn’t hot enough, the naan will cook slowly, drying out and failing to achieve the desired texture and appearance.
-
Cooking at the Wrong Temperature: Related to preheating, cooking naan at the incorrect temperature throughout the process can ruin your efforts.
- Too High: If the skillet is too hot, the naan exterior will cook and char too quickly, potentially burning, while the inside remains undercooked or doughy.
- Too Low: Conversely, if the temperature is too low, the naan won’t puff up properly, nor will it develop those beautiful, slightly charred “tandoor-style” spots that add to its authentic flavor and visual appeal. Maintaining a consistent medium-high heat is key.
- Struggling with Sticky Dough: This dough is intentionally sticky because that stickiness contributes directly to its incredible softness and stretch. However, it can be challenging to handle. The mistake is often trying to compensate by adding excessive amounts of flour to the dough itself. Instead, liberally flour your work surface *before* turning out the dough. Also, sprinkle flour on the tops of the dough balls before covering them for their first rise. When handling the dough, lightly flour your hands or dampen them with water. This provides just enough lubrication to manage the stickiness without incorporating too much extra flour into the dough, which would make it stiff and less tender.
Make Ahead & Storage Tips for Your Naan
This garlic naan recipe is wonderfully versatile, allowing you to prepare components in advance for easier meal planning or store cooked naan for later enjoyment.
How to Store Uncooked Naan Dough:
- Prepare the dough as instructed, through the kneading step (Step 3).
- Instead of dividing it into small balls, leave the dough as one large ball. This makes it easier to handle after refrigeration, as smaller balls can become excessively floppy and sticky.
- Lightly oil a large bowl, then place the dough ball in it and roll it around to ensure it’s fully coated in oil. This prevents a dry, hard crust from forming on the surface during storage.
- Tightly wrap the bowl with plastic wrap, ensuring an airtight seal.
- Refrigerate the dough for up to 4 days. The cold fermentation will actually enhance its flavor!
What to Do When You’re Ready to Use Chilled Dough:
- When ready to bake, remove the bowl from the refrigerator.
- Generously flour a clean work surface. Carefully dump the chilled dough onto the floured surface.
- Divide the dough into 8 equal portions and roll each into a ball, as directed in Step 4.
- Crucially, allow the dough balls to come to room temperature for at least 30-60 minutes before proceeding with rolling, resting, and cooking. Cold dough will be difficult to roll and won’t puff up correctly.
Once cooked, garlic naan is best enjoyed fresh, but it can be stored for a short period. Allow the naan to cool completely at room temperature before transferring it to an airtight container. It will keep at room temperature for up to 2 days. For longer storage, freezing is your best option!
How to Reheat Cooked Garlic Naan:
Reheating naan properly brings back its softness and warmth, almost like freshly made:
- Oven Method (for multiple pieces): Stack several pieces of naan, wrap them tightly in aluminum foil, and reheat in a preheated oven at 350°F (175°C) for 10-15 minutes, or until thoroughly warmed through and pliable.
- Toaster Method (for individual pieces): For a quick reheat of a single piece, simply pop it into your toaster or toaster oven until warm and slightly crispy. You may need to fold or break larger pieces in half to fit.
- Skillet Method: Reheat in a dry skillet over medium heat for 1-2 minutes per side until warm and soft.
Delicious Pairings: How to Serve This Garlic Naan Recipe
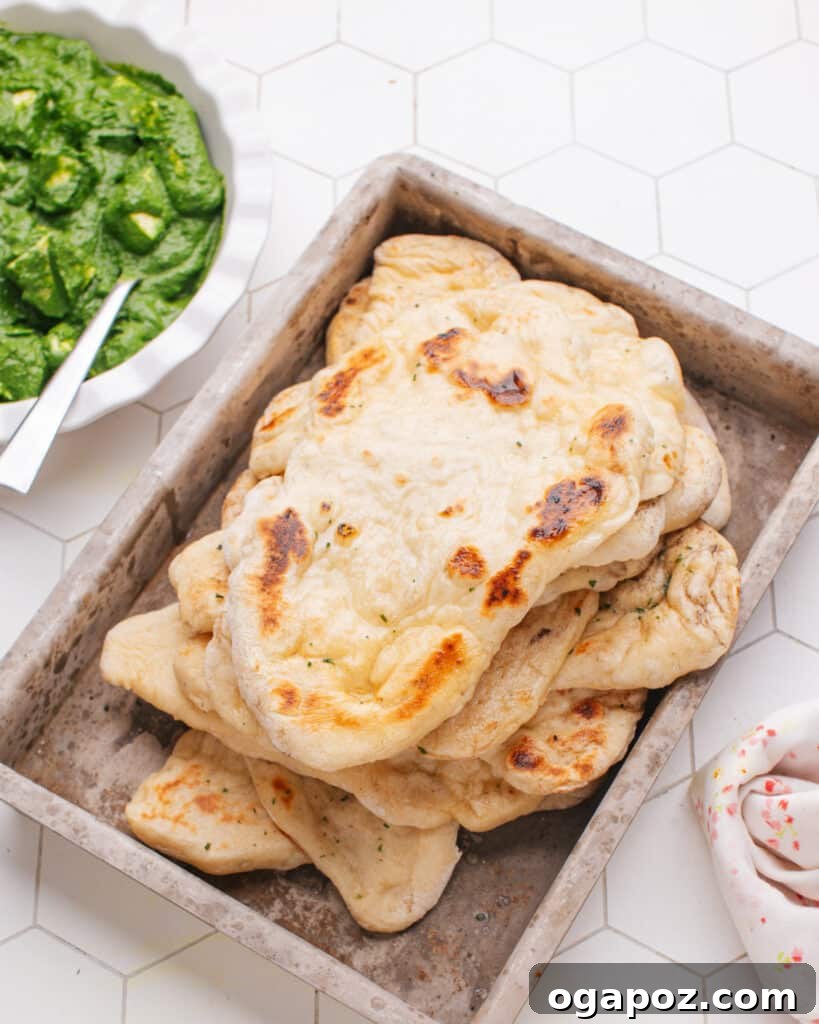
This ultra-soft and flavorful garlic naan is the ultimate accompaniment to almost any Indian meal, transforming your dining table into an authentic experience. Here are some incredible dishes to serve alongside your homemade creation:
- Start with Savory Samosas: Begin your feast with classic Indian appetizers. Pair your naan with crispy Beef Samosas, flavorful Chicken Samosas, or the ever-popular Potato Samosas. Or, why not prepare all three for a truly epic starter platter?
- Rich and Creamy Curries: Naan is designed to mop up rich gravies. Try it with a luxurious Paneer Butter Masala, a creamy and tangy curry featuring Indian cheese. Alternatively, dive into a pot of vibrant Saag Paneer, a delicious spinach and cheese curry that’s both healthy and hearty.
- Hearty Vegetarian Mains: For other delightful main course options, consider Malai Kofta, tender cheese and vegetable dumplings in a rich sauce, or the classic Palak Paneer. Serve one or an array of these dishes for a comprehensive Indian spread!
- Beyond Indian Cuisine: Don’t limit your naan! It’s fantastic with Mediterranean dips like hummus, as a side for grilled meats, or even as a base for mini pizzas. The possibilities are endless.
Frequently Asked Questions About Garlic Naan
Got more questions? Here are answers to some of the most common queries about making homemade garlic naan:
Can I use whole wheat flour instead of all-purpose flour?
Yes, you absolutely can! To maintain some of the naan’s signature softness and elasticity, we recommend substituting whole wheat flour for up to half of the all-purpose flour (e.g., 2 cups all-purpose, 2 cups whole wheat). Using 100% whole wheat flour can result in a denser, less airy naan. A 50/50 mix offers a wonderful balance of nutritional benefits and desired texture. You might need to adjust the water slightly, as whole wheat flour can absorb more liquid.
Can I make the dough without a stand mixer?
Certainly! A stand mixer is a convenience, but not a necessity. To make the dough by hand, combine all the dry ingredients in a large mixing bowl. Gradually add the yogurt and warm water, stirring with a sturdy wooden spoon until a shaggy dough forms. Then, turn the dough out onto a lightly floured surface and knead it vigorously by hand for about 10-15 minutes. Continue kneading until the dough is smooth, elastic, and feels supple to the touch. It’s a great arm workout!
Why is my dough too sticky to handle?
It’s important to remember that this naan dough is designed to be quite sticky. This high hydration is what contributes to its incredible softness and stretchiness. If it’s truly unmanageable, first try flouring your hands generously or lightly dampening them with water—this often provides enough ease of handling. Avoid the temptation to add large quantities of extra flour to the dough itself, as this is the quickest way to make your naan tough and dry. A little stickiness is a good thing!
Can I cook naan in the oven instead of a skillet?
Absolutely! If you don’t have a cast iron skillet or prefer using your oven, you can certainly bake naan. Preheat your oven to its highest setting, typically around 475°F (245°C), with a pizza stone or heavy baking sheet inside. Let it preheat for at least 20-30 minutes to get thoroughly hot. Carefully place a rolled naan onto the hot stone/sheet. Bake for approximately 2-3 minutes per side, or until the naan puffs up beautifully and develops golden-brown spots. Keep a close eye on it, as oven temperatures can vary.
What is the history of Naan bread?
Naan has a rich history, with its origins tracing back to ancient Persia. It’s believed to have been introduced to India during the Mughal era, becoming a staple in royal courts and eventually in households across the subcontinent. Traditionally, naan is baked in a tandoor oven, a cylindrical clay oven that imparts a unique smoky flavor and characteristic bubbles and char. Its name literally means “bread” in Persian.
Is Naan bread naturally vegan or gluten-free?
Traditional naan is generally not vegan due to the use of yogurt and butter, nor is it gluten-free as it relies on wheat flour. However, as noted in our variations, you can adapt this recipe by using plant-based yogurt and non-dairy butter for a vegan version. For a gluten-free option, many have found success with all-purpose gluten-free flour blends, though the texture might differ slightly from traditional wheat naan.
More Irresistible Indian Recipes You’ll Love
Expand your Indian cooking repertoire with these other treasured recipes from my kitchen. Each one pairs perfectly with your freshly made garlic naan!
- Creamy Madras Lentils: Indulge in the ultimate vegetarian comfort food with my recipe for Madras Lentils. This rich and hearty lentil dish is simply begging to be mopped up with soft, warm naan or roti.
- Flavorful Potato Curry: Create a hearty, budget-friendly meal with my Potato Curry (Aloo Masala). These tender potatoes soak up an incredible depth of flavor from the spices, making it a satisfying and delicious choice.
- Authentic Indian Chai Tea: No Indian meal is complete without a warming cup of Indian Chai. Learn to make this spiced tea the traditional way, a perfect end to your culinary journey.
- Flaky Layered Paratha: Take your Indian bread-making skills to the next level with my recipe for Paratha, a flaky, layered South Indian flatbread that’s delightful on its own or with curries.
- Hearty Chickpea Curry: Discover another super tasty, cost-effective, and wonderfully hearty vegetarian curry with my Indian Chickpea Curry (Chana Masala). It’s a personal favorite for its robust flavors and satisfying texture.
Craving More Naan? Explore These Recipes!
If you’ve fallen in love with homemade naan, I’ve got even more delicious variations for you to explore:
- Cheese Naan: A universally loved favorite, stuffed with gooey melted cheese.
- Aloo Naan: Naan bread generously stuffed with a spiced potato filling.
- Keema Naan: A savory naan filled with flavorful minced meat.
- Butter Naan: The classic, simply irresistible buttery flatbread.
Recipe: Garlic Naan (Ultra Soft + Stretchy!)
By: Jennifer Pallian BSc, RD
Learn how to make ULTRA soft and stretchy homemade garlic naan that’s even better than restaurant versions! This easy, viral recipe has been perfected over 20 years.
Prep Time: 15 minutes
Cook Time: 2 minutes per naan
Servings: 8
Ingredients
For the Garlic Naan
- 4 cups all-purpose flour
- 1 tbsp instant dry yeast
- 2 tsp kosher salt
- 1 tsp baking powder
- ½ tsp baking soda
- ¾ cup plain yogurt or buttermilk
- 1 cup warm water
- 4 tbsp butter, melted (for brushing)
- 4 cloves garlic, minced (for brushing)
- 1 tbsp minced cilantro, optional (for brushing)
Instructions
- Mix Dry Ingredients: In a stand mixer with a paddle attachment, combine flour, yeast, salt, baking powder, and baking soda. Mix on low speed until well combined.
- Add Wet Ingredients: Add yogurt and warm water to the bowl. Mix on low speed until a shaggy dough forms.
- Knead the Dough: Switch to the hook attachment and knead on medium-low speed for 4 minutes. The dough will be sticky initially but will come together during kneading. Avoid adding extra flour unless absolutely necessary.
- Divide and Shape: Generously flour your work surface. Turn out the dough, sprinkle with flour, and knead briefly into a large ball. Divide into 8 equal portions, rolling each into a ball. Dampen hands if needed to handle the sticky dough, adding a touch more flour if necessary.
- First Rise: Lightly oil a sheet of parchment paper. Place dough balls on it, roll them to coat with oil, and cover with another piece of parchment. Let rise in a warm place for 1 hour.
- Roll and Rest: On a floured surface, roll each dough ball with a rolling pin to about ¼” thick, creating a slightly oblong shape. Lightly flour as needed. Let rest for 10 minutes.
- Preheat and Cook: Preheat a cast iron skillet over medium-high heat for 5 minutes. Test heat by sprinkling a few drops of water; if they sizzle and evaporate, the pan is ready. Place a naan in the skillet, cover, and cook until bubbles form (30-60 seconds). Flip and cook until charred spots appear (about 30 seconds more).
- Brush with Garlic Butter: Transfer cooked naan to a plate and cover with a towel to keep warm. Mix melted butter with minced garlic and cilantro (if using). Brush warm naan immediately with the garlic butter.
Notes
- Flour Measurement Tip: For accuracy, use a kitchen scale to weigh your flour. Volume-based measuring cups can lead to over-flouring.
- Hand-Mixing Option: No stand mixer? No problem! Combine dry ingredients, then add wet, stirring to form a shaggy dough. Knead by hand on a floured surface for about 10 minutes until smooth and elastic.
- Direct Flame Variation: For a true tandoori experience, after flipping and cooking the underside for 5-10 seconds to seal, use tongs to place the naan directly over a lit gas burner. Cook until it puffs and chars in spots (just a few seconds), then transfer to a plate and cover. Watch carefully, as it burns quickly!
Nutrition (Approximate per serving)
Calories: 271kcal | Carbohydrates: 46g | Protein: 7g | Fat: 9g | Saturated Fat: 4g | Polyunsaturated Fat: 1g | Monounsaturated Fat: 2g | Trans Fat: 0.2g | Cholesterol: 18mg | Sodium: 761mg | Potassium: 49mg | Fiber: 6g | Sugar: 3g | Vitamin A: 202IU | Vitamin C: 1mg | Calcium: 104mg | Iron: 2mg
Nutrition information is automatically calculated and should only be used as an approximation.
Tried this recipe? Share your thoughts and leave a comment below! Your feedback helps other home cooks!