

Welcome to the ultimate guide for making a truly delightful and incredibly easy Chicken Biryani! This recipe is a fast, satisfying, and flavor-packed one-pot dinner that has become a beloved staple in my half-Indian family’s kitchen. It’s perfect for those craving authentic Indian flavors without the traditional time commitment.

For many, traditional Indian biryani evokes images of elaborate culinary projects. And rightly so! The classic method is a masterful symphony of steps: painstakingly marinating meat overnight, frying onions to a deep, caramelized gold, separately cooking fragrant basmati rice to individual perfection, blooming whole aromatic spices in ghee, then meticulously layering everything with fresh herbs, toasted nuts, and sometimes even saffron-infused milk. This multi-pot, extended-timing endeavor undeniably yields an incredibly delicious and complex dish, a true celebration meal reserved for special occasions.
However, what if you could capture the essence of that incredible flavor profile on a regular weeknight? My shortcut biryani does exactly that. It stands out as one of my favorite chicken and rice dinner recipes because it ingeniously streamlines many traditional biryani steps. The secret lies in its one-pot magic: tender, beautifully spiced chicken cooks right alongside the basmati rice, infusing every grain with rich, aromatic goodness. You get all the comfort and complex flavors of biryani with significantly less fuss and cleanup.
Essential Ingredients for Shortcut Chicken Biryani
While traditional biryani often calls for an extensive array of whole and ground Indian spices, my shortcut version simplifies the list without compromising on depth of flavor. We focus on key spices and fresh ingredients that deliver maximum impact with minimal effort, making it far more accessible than my Amma’s (mother’s) real biryani.
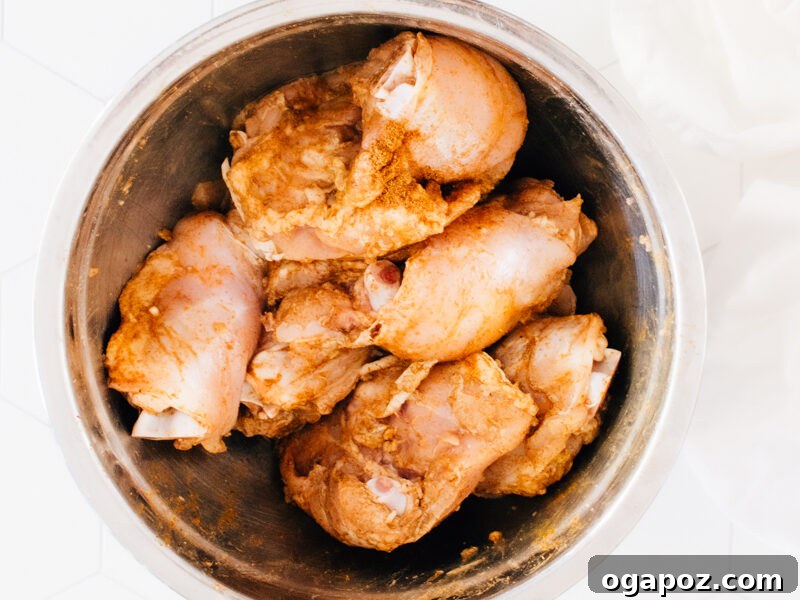
For the Flavorful Chicken Marinade
A quick marinade is crucial for infusing the chicken with flavor and ensuring it stays juicy and tender as it cooks with the rice. These simple ingredients pack a punch:
- Bone-in, skinless chicken thighs: I often buy bone-in, skin-on thighs and simply pull the skin off. The bones contribute immense flavor and moisture to the overall dish, enriching the broth and rice.
- Fresh Lemon juice: Adds a bright, tangy acidity that tenderizes the chicken and enhances the spice profile.
- Minced Garlic: A foundational aromatic in Indian cuisine, providing a pungent, savory base.
- Garam masala: This aromatic blend of ground, warm spices is the heart of biryani flavor. Alternatively, a good quality British/US-style curry powder can be used for a slightly different, but still delicious, profile.
- Kosher salt: Essential for seasoning the chicken from within, drawing out its natural flavors.
For the Aromatic Biryani Base
These ingredients form the rich, fragrant foundation for our one-pot biryani, creating a complex taste that belies its simple preparation.
- Avocado oil: A high smoke point oil, perfect for sautéing onions and spices.
- Butter: Adds a rich, luxurious depth and helps achieve beautifully browned onions.
- Onion: Sautéed until golden, onions are key to building the savory base and contribute natural sweetness.
- Green chillies: Provide a fresh, vibrant heat. Adjust the quantity and whether you seed them based on your preferred spice level.
- Minced Garlic: Another layer of pungent flavor, enhancing the overall aroma.
- Garam masala or curry powder: This second addition reinforces the signature spice blend. Note that garam masala will yield a darker, richer color, while curry powder often results in a lighter hue (as seen in some photos).
- Paprika: Contributes a mild, sweet peppery note and a beautiful reddish color.
- Cayenne: For an extra kick of heat, complementing the green chillies. Can be adjusted or omitted.
- Turmeric: Adds earthy warmth and the characteristic golden-yellow color to the rice.
- Tomato: Diced fresh tomato or canned tomato puree adds a touch of acidity and sweetness, creating a saucy element for the chicken.
- Chicken broth: The liquid base for cooking the rice and ensuring moist, tender chicken.
- White basmati rice: The quintessential rice for biryani, known for its long, slender grains and fragrant aroma. Rinsing is key for separate, fluffy grains.
- Bay leaf (optional): Infuses a subtle, herbal note that enhances the overall fragrance.
- Kosher salt: Seasoning in layers is essential for a well-balanced dish.
Variations and Substitutions to Fit Your Kitchen
This shortcut biryani recipe is highly adaptable. Feel free to tweak it to suit your preferences or what you have on hand, ensuring delicious results every time.
- Boneless chicken swap: If using boneless chicken thighs, they cook faster. Add them about 15 minutes into the covered cooking time to prevent overcooking and ensure they remain tender. Cut them into large chunks to maintain juiciness.
- Mild heat: For a gentler spice level, simply skip the ground cayenne pepper and/or remove the seeds from the green chillies before chopping.
- Vegetable add-ins: Boost the nutrition and texture by stirring in frozen peas or fresh spinach during the final rest period off the heat. This allows them to warm through without becoming mushy.
- Dairy-free option: Easily make this recipe dairy-free by replacing the butter with an equal amount of additional avocado oil or another neutral cooking oil.
- No broth on hand: No problem! You can substitute chicken broth with water combined with a good quality chicken bouillon cube or paste for a similar savory base.
If you love easy, flavorful chicken and rice combinations, you might also enjoy my other cherished recipes like Cheesy Chicken Broccoli and Rice Casserole for comforting family dinners, or my elegant Oven-Baked Chicken and Rice with Lemon and Mushrooms for a lighter, zestier meal.
How to Master Shortcut Chicken Biryani: A Step-by-Step Easy Guide
Creating this flavorful one-pot chicken biryani is surprisingly simple, designed for cozy and delicious weeknight meals. The steps are straightforward, promising a big payoff in taste and aroma. For another life-changing Indian classic, don’t forget to try my famous butter chicken recipe!
Step 1: Marinate the Chicken for Maximum Flavor
In a bowl, combine the bone-in, skinless chicken thighs with fresh lemon juice, minced garlic, garam masala (or curry powder), and a generous pinch of kosher salt. Toss everything together until the chicken is well coated. Set this aside at room temperature while you prepare the other biryani components. Even a quick marinating time of 15-20 minutes here works wonders, allowing the flavors to penetrate the meat and start the tenderizing process.
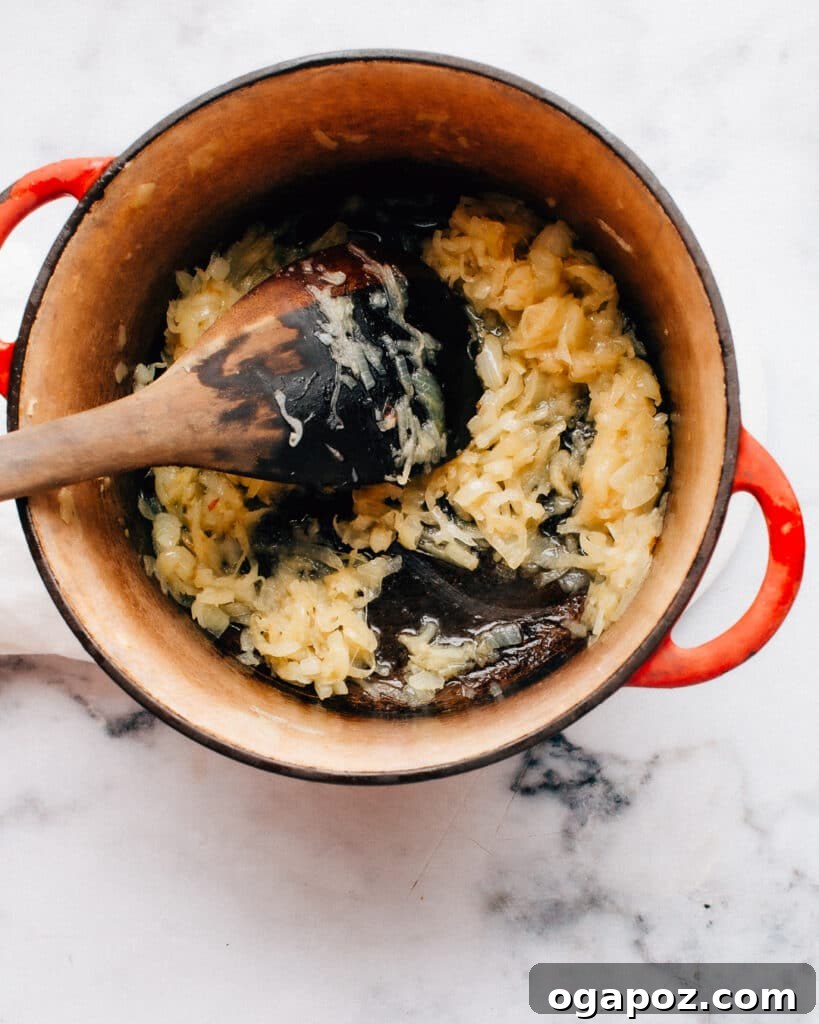
Step 2: Build the Golden Onion Base
In a large, heavy-bottomed Dutch oven or pot, heat the avocado oil and butter over medium heat. Add the chopped onions along with a pinch of kosher salt. Cook the onions slowly, stirring occasionally, until they become beautifully soft, translucent, and turn a rich golden color. This patient step is essential for developing the deep, savory-sweet flavor foundation that is characteristic of biryani, even in a shortcut version.
Step 3: Infuse with Spices and Tomato
Once the onions are golden, stir in the minced garlic, garam masala (or curry powder), paprika, cayenne pepper, turmeric, and finely chopped green chillies. Cook for about two minutes, stirring constantly, until the spices become wonderfully fragrant. This “blooming” of spices in hot oil intensifies their aroma and flavor. Next, add the diced tomato (or tomato puree) and cook for another minute, allowing the tomato to soften slightly and meld with the spices.
Step 4: Combine Rice and Liquid
Pour in the chicken broth, followed by the well-rinsed and drained basmati rice, the remaining kosher salt, and the optional bay leaves. Stir gently to combine everything, ensuring the rice is evenly distributed at the bottom of the pot. Rinsing the rice thoroughly until the water runs clear is a critical step; it removes excess starch, preventing the grains from clumping together and ensuring a fluffy, separate texture.
Step 5: Nestle Chicken and Steam to Perfection
Carefully nestle the marinated chicken thighs, along with any remaining marinade, into the rice mixture in an even layer. Bring the mixture to a gentle simmer over medium heat. Once simmering, reduce the heat to low, cover the pot tightly, and cook for approximately 20 minutes. This steaming process allows the chicken to cook through to a safe internal temperature of 165°F (74°C) while the rice absorbs the flavorful liquid, becoming tender and aromatic. (Note: larger chicken thighs may require a few extra minutes of cooking).
Step 6: Fluff and Finish for Optimal Texture
After 20 minutes, turn off the heat but keep the pot covered. Let it rest undisturbed for at least 5 minutes. This crucial resting period allows the steam to redistribute within the pot, ensuring the rice finishes cooking without becoming mushy and the chicken remains incredibly juicy. Finally, remove the lid and gently fluff the biryani with a fork, separating the rice grains and mixing the chicken evenly. Cover again and let it rest for another 5 minutes before serving. This final rest locks in moisture and perfects the texture of both the rice and chicken.

5 Common Mistakes to Avoid When Making Chicken Biryani
Even with a shortcut recipe, certain pitfalls can prevent your biryani from reaching its full potential. Here are the most frequent mix-ups to steer clear of, ensuring your dish is consistently delicious and perfectly textured:
- Skipping the rice rinse: This is perhaps the most common mistake. Unrinsed basmati rice retains excess surface starch, which causes the grains to stick together and become clumpy and gummy during cooking. Always rinse your basmati rice thoroughly under cold running water until the water runs completely clear. This simple step ensures each grain remains separate and fluffy, a hallmark of excellent biryani.
- Cooking on high heat: Boiling the rice too vigorously can cause the grains to split and become mushy on the outside while remaining undercooked in the center. After bringing the liquid to a gentle simmer, immediately reduce the heat to low. The biryani should cook with gentle, consistent heat, allowing the rice to absorb the liquid slowly and evenly.
- Under-cooking the onions: Pale, under-sautéed onions result in a flat, one-dimensional flavor profile for your biryani. Take your time during the initial sautéing step; the onions should be soft, translucent, and caramelized to a beautiful golden-brown. This process develops a crucial depth of sweetness and umami that forms the backbone of the biryani’s taste.
- Lifting the lid prematurely: Once the pot is covered and simmering, resist the urge to peek! Every time you lift the lid, precious steam escapes, disrupting the internal cooking environment. This leads to unevenly cooked rice (often undercooked on top) and can dry out the chicken. Trust the process and wait until the designated cooking time is complete, followed by the essential resting period.
- Oversalting late in the process: Biryani, like many complex dishes, benefits from seasoning in layers. If you add all the salt at once, especially towards the end, it might not integrate properly, leading to an unevenly seasoned dish. Instead, season the chicken marinade, the onion base, and the rice-and-broth mixture separately and taste as you go. This allows for balanced, harmonious seasoning throughout the entire dish.
How to Serve Your Shortcut Chicken Biryani
This shortcut chicken biryani is a complete meal in itself, hearty and flavorful. I love to serve it hot, straight from the pot, spooned generously into individual bowls. The key to a balanced and truly authentic Indian dining experience is to pair the warm, spiced biryani with cool, creamy, and fresh sides that offer a delightful contrast in temperature and texture.
Perfect Toppings to Enhance Your Biryani
- Raita (Indian yogurt sauce): A cooling, creamy yogurt-based condiment often mixed with cucumber, mint, or other herbs. It’s essential for cutting through the richness and spice of the biryani.
- Fresh cilantro and mint: A generous sprinkle of freshly chopped herbs adds a burst of vibrant color and refreshing aroma, brightening the dish.
- Fried onions: For an extra layer of sweetness and crunch, a garnish of crispy fried onions is a traditional and highly recommended topping.
- Thin slices of red onion: Offer a sharp, zesty counterpoint to the rich flavors.
- Lemon or lime wedges: A squeeze of fresh citrus juice over the top just before eating adds a crucial zing and brightens all the flavors.
- Toasted cashews or almonds: Provide a delightful crunch and nutty flavor, adding another dimension of texture.
Complementary Side Dishes for Chicken Biryani
- Indian cucumber yogurt salad: My father-in-law’s recipe for Indian cucumber yogurt salad is a perfect fresh and cooling accompaniment, similar to a raita but with more substantial cucumber pieces.
- Warm bread: Soft, chewy butter naan or crispy papadum are excellent for scooping up every last bit of flavorful rice and chicken.
- A simple green salad: A light, fresh green salad with a bright, lemony vinaigrette can provide a refreshing counterpoint to the rich biryani.
Make Ahead and Storage Solutions
One of the many benefits of this chicken biryani is how well it stores, making it an excellent candidate for meal prep. Cook once and enjoy delicious, easy meals throughout the week with these practical tips.
Storing Leftovers Safely and Deliciously
- Chill fast: To ensure food safety and maintain quality, cool any leftover biryani quickly. Transfer it to shallow, airtight containers and refrigerate within two hours of cooking. It will keep beautifully for up to 4 days.
- Maintain moisture: Rice can dry out in the fridge. To protect its texture, add a small splash of chicken broth or water to the biryani when storing it. This helps keep the grains tender and prevents them from becoming brittle upon reheating.
- Aroma guard: Biryani is highly aromatic! To prevent its wonderful spices from perfuming your entire fridge (and other foods), ensure containers are sealed exceptionally well.
Freezing for Future Meals
- Portion first: For convenience, freeze biryani in individual meal-sized containers. This makes thawing and reheating specific portions quick and easy. It can be stored in the freezer for up to 2 months.
- Thaw overnight: For the best texture and even reheating, always thaw frozen biryani overnight in the refrigerator before warming.
- Rice care for reheating: Frozen and thawed rice can sometimes be a bit dry. Before reheating, add a tablespoon or two of water or broth to the portion. This helps revive the fluffiness and moisture of the rice.
Reheating Shortcut Chicken Biryani for Best Results
Whether from the fridge or freezer, reheating biryani properly ensures it tastes just as good as the first day.
- Microwave method: Place a portion in a microwave-safe dish, add a splash of water or broth, cover loosely with a lid or damp paper towel, and heat in 1-2 minute bursts, stirring occasionally, until thoroughly hot.
- Stovetop method: For larger quantities or a richer reheat, transfer biryani to a pot, add a splash of broth, cover, and warm gently over low heat, stirring occasionally, until heated through. The low heat prevents scorching.
- Oven method: Spread the biryani evenly in an oven-safe dish, add a little broth, cover tightly with foil, and bake at 300°F (150°C) for 20-30 minutes, or until steaming hot. This method is excellent for maintaining moisture.
Final Notes, Pro Tips, and Science-Based Secrets for Perfect Biryani
Unlock the full potential of your shortcut chicken biryani with these expert takeaways, rooted in both culinary wisdom and a touch of food science:
- Season in layers: As mentioned, seasoning at different stages—the chicken marinade, the sautéed onions, and the liquid for the rice—ensures that every component of the biryani is perfectly seasoned. This builds a complex, balanced flavor from the ground up, rather than a surface-level application.
- Rinse for fluffiness: The science behind rinsing basmati rice is simple: it removes the starchy coating on the outside of the grains. Without this rinse, the starch becomes gelatinized during cooking, causing the grains to stick together and create a gummy texture. A quick rinse until the water runs clear is a small effort for a huge impact on texture.
- Low and covered heat is key: Cooking biryani over gentle, low heat with a tight-fitting lid creates a steaming environment. This even, moist heat allows the rice grains to absorb liquid slowly and expand without bursting, resulting in separate, tender grains. It also ensures the chicken cooks gently, preventing it from drying out and keeping it succulent.
- The power of rest: After the biryani has cooked, turning off the heat and allowing it to rest, still covered, for 5-10 minutes is critical. This resting period allows residual steam to further cook the rice and chicken without overcooking. The moisture redistributes, making the rice exceptionally tender and the chicken remarkably juicy, preventing mushiness and promoting a perfect finish.
Frequently Asked Questions About Shortcut Chicken Biryani
Just skimming through or have a specific question? Here are quick, comprehensive answers to commonly-asked questions about making this easy chicken biryani.
Absolutely! Using boneless chicken, especially boneless thighs, works very well for biryani as they remain juicy. For best results, cut them into large, roughly 2-inch chunks to prevent them from overcooking and drying out. Reduce the covered cook time to about 15 minutes before the final rest, as boneless chicken cooks much faster than bone-in.
While soaking basmati rice is a common practice in traditional biryani to elongate the grains, it is not strictly required for this shortcut method. Rinsing the rice thoroughly until the water runs completely clear is sufficient to remove enough surface starch, which is crucial for achieving separate, fluffy grains. If you do choose to soak your rice (for about 20-30 minutes), be sure to reduce the amount of chicken broth slightly (by about ¼ cup) to avoid overly mushy rice.
No, garam masala and curry powder are distinct spice blends. Garam masala is typically a fragrant, warm finishing blend of spices like cardamom, cinnamon, cloves, and black pepper, and often does not contain turmeric. Curry powder, on the other hand, is a more robust and often turmeric-heavy blend, sometimes with cumin, coriander, and chili. For the most classic and authentic biryani flavor profile, it’s highly recommended to use garam masala in both the chicken marinade and the biryani pot.
The spice level of this biryani is quite adaptable. With one green chilli and a little cayenne, it delivers a pleasant, gentle warmth that most palates can enjoy. For those who prefer a milder dish, you can easily omit the cayenne pepper entirely or remove the seeds from the green chilli before chopping. If you enjoy more heat, feel free to add another green chilli at the spice-blooming step, always tasting before the final steam to ensure it meets your preference.
Absolutely! Adding vegetables to your chicken biryani is a great way to boost nutrition and flavor. Frozen peas or a few handfuls of fresh spinach are excellent choices; they can be stirred into the biryani during the final 5-minute rest period off the heat. This allows them to gently warm through and cook just enough to retain their bright color and fresh texture. Avoid adding water-heavy vegetables (like zucchini) during the main simmer, as they can release too much moisture and make the rice soggy.
For optimal results with biryani, a heavy-bottomed Dutch oven with a tight-fitting lid is undoubtedly the best choice. Its thick walls and base help maintain a gentle, even heat distribution, which is crucial for preventing the rice from scorching at the bottom while ensuring it cooks perfectly throughout. The snug lid traps steam efficiently, creating the ideal environment for fluffy rice and tender chicken. Thin or lightweight pots tend to heat unevenly, which can lead to burnt rice or undercooked sections.
Preventing soggy rice involves several key steps: First, thoroughly rinse your basmati rice until the water runs clear to remove excess starch. Second, use the accurate liquid-to-rice ratio as specified in the recipe. Third, maintain gentle, low heat during the simmering process, avoiding a hard boil. Most importantly, keep the pot covered tightly and resist the urge to peek during cooking and the subsequent rest period, as steam is essential for even cooking. If your stove tends to run hot, placing a baking sheet under the pot can help diffuse the heat more evenly.
Yes, making this biryani dairy-free is quite simple. Replace the butter in the recipe with an equal amount of additional avocado oil or another neutral cooking oil. When serving, opt for coconut yogurt as a cooling contrast instead of traditional raita, or prepare a dairy-free raita using a plant-based yogurt alternative.
More Beloved Indian Recipes: My Indian Husband’s Favorites
Inspired by the rich flavors of biryani? Put some of my husband Adarsh’s absolute favorite Indian recipes on your must-make list for truly authentic and satisfying meals:
- Paratha (A wonderfully flaky, layered Indian flatbread that’s perfect for scooping up curries).
- The Chicken Korma that he famously says will change your life with its creamy, rich sauce.
- Butter Paneer (The vegetarian version of the classic Butter Chicken, featuring soft paneer cheese in a velvety tomato sauce).
- Saag Paneer (The most delicious way to enjoy a pound of spinach, combined with paneer in a vibrant, spiced curry).
- Flaky Homemade Potato Samosas, crispy Chicken Samosas, and even a unique Samosa Pie (it’s clear we really love samosas in all their forms!).
- Creamy Madras Lentils (The ultimate vegetarian comfort food, rich and satisfying).
- Amma’s special Masoor Dal (A simple yet incredibly flavorful red lentil soup) and a hearty Indian Chickpea Curry Recipe (Channa Masala).
- Malai Kofta (Delicate paneer and potato balls simmered in a rich, creamy tomato sauce).
- Authentic Indian Chai (Learn to brew tea the authentic Indian way, spiced and milky).

Pin
Easy Chicken Biryani (Shortcut Recipe!)
Jennifer Pallian BSc, RD
15
25
5
Ingredients
For Chicken
-
2.2 lbs bone-in, skinless chicken thighs -
2 tbsp lemon juice -
2 cloves garlic minced -
1 tbsp garam masala (or curry powder) -
2 tsp kosher salt
For Biryani
-
3 tbsp cooking oil -
3 tbsp butter -
2 ½ cups chopped onion about 2 medium-large -
2 green chillies finely chopped -
3 tsp kosher salt divided use -
3 tbsp minced garlic -
1 tbsp garam masala (or curry powder) -
1 tsp paprika -
½ tsp ground cayenne -
½ tsp turmeric -
1 large diced tomato (or 1/2 cup canned tomato puree or canned diced tomato with juices) -
3 cups chicken broth -
1 ½ cups basmati rice rinsed well and drained -
2 bay leaves (optional)
Instructions
Marinate Chicken:
-
Combine chicken with lemon juice, garlic, garam masala (or curry powder), and the marinade salt. Let stand at room temperature while you prep the biryani rice.
Make Biryani Rice:
-
Heat oil and butter in a large Dutch oven over medium heat. Add onion and ½ tsp of the biryani salt; cook until soft and golden.
-
Add garlic, garam masala (or curry powder), paprika, cayenne and turmeric and cook 2 minutes, until fragrant.
-
Add tomato; cook a minute more, then stir in broth, rinsed rice, remaining 2 1/2 tsp kosher salt and bay leaves, if using.
-
Stir in chicken thighs, cover the pot and bring to a boil. Reduce heat to low; cook until chicken is cooked through to 165ºF and rice is tender, about 20 minutes (larger thighs may take a little longer).
-
Let stand, covered for 5 minutes. Fluff gently with a fork and serve with plain yogurt or coconut chutney.
Notes
- Use garam masala for classic flavor; curry powder works but gives a lighter color.
- If your stove runs hot, slide a baking sheet under the pot to diffuse heat and prevent scorching.
- Leftovers keep for up to 4 days when chilled; reheat with a splash of broth or water for best texture.
Nutrition
Calories:
409
kcal
|
Carbohydrates:
60
g
|
Protein:
6
g
|
Fat:
16
g
|
Saturated Fat:
5
g
|
Polyunsaturated Fat:
3
g
|
Monounsaturated Fat:
7
g
|
Trans Fat:
0.3
g
|
Cholesterol:
18
mg
|
Sodium:
3022
mg
|
Potassium:
287
mg
|
Fiber:
4
g
|
Sugar:
6
g
|
Vitamin A:
1002
IU
|
Vitamin C:
16
mg
|
Calcium:
53
mg
|
Iron:
1
mg
Nutrition information is automatically calculated, so should only be used as an approximation.
Tried this recipe? Leave a comment!