

For nearly two decades, I’ve been on a culinary quest to master the art of making the perfect **Naan bread**. Living with my Indian husband for 19 years, this journey has been a labor of love, countless experiments, and a deep dive into authentic Indian flavors. The result is this meticulously perfected homemade naan recipe: so incredibly soft, wonderfully stretchy, and imbued with a rich, inviting aroma. When generously brushed with melted butter, it transforms into the glorious **Butter Naan** – a truly irresistible treat that rivals any restaurant-quality flatbread.

Reader Rating
⭐️⭐️⭐️⭐️⭐️ “After trying many different naan recipes, my Instagram algorithm led me here. And I gotta say this recipe is a complete gamechanger. This is naan-perfection and will be my go-to recipe from now on. THANK YOU FOR SHARING THIS BRILLIANT RECIPE WITH US!”
– Laura
The Best Butter Naan: Why You’re Going to Fall in Love with This Recipe
After almost two decades immersed in Indian culinary traditions through my marriage, I can confidently say this butter naan recipe is the culmination of extensive experimentation and a deep understanding of what makes truly authentic naan. This isn’t just another recipe; it’s an extensively tested, family-approved method that consistently delivers perfect results, passing the authenticity test with flying colors. Get ready to experience naan like never before, right in your own kitchen!
- Traditional and Flavorful: This isn’t just any flatbread; **Butter Naan** is a traditional Indian leavened flatbread. Once cooked, each piece is lavishly **brushed with melted butter**, infusing it with an irresistible richness. For delightful variations, consider adding freshly minced cilantro (coriander) leaves for a vibrant garnish, or incorporate minced garlic into the melted butter for an aromatic garlic naan that’s bursting with flavor.
- Effortless Tandoori Style at Home: While traditionally cooked in a scorching hot tandoor clay oven, my innovative workaround makes it incredibly easy for you to replicate that coveted tandoori flavor and distinctive charred look. All you need is a simple cast iron skillet right on your stovetop. This method ensures you achieve those beautiful bubbles and slightly crisp, smoky edges without needing specialized equipment.
- Complex Bread Flavor (No Sourdough Needed): The secret to this naan’s deep, delicious flavor lies in the harmonious combination of **yeast and yogurt**. This pairing creates a complex, slightly tangy profile reminiscent of sourdough naan, but without the need for a time-consuming sourdough starter. The yogurt contributes to the dough’s incredible tenderness and unique taste.
- Visually Stunning & Irresistible Texture: Prepare to be amazed as the naan gloriously **puffs up** on the pan (or tawa, as it’s known in India). Those beautiful, inviting charred spots that appear are not just for show; they add a fantastic depth of flavor and an irresistible texture. For an even more dramatic puff, replicating the true tandoori experience, check out my advanced notes in the recipe for finishing your naan over a direct gas flame (if you have a gas stove).
I guarantee that this easy tandoori-style naan will rival the naan from your favorite Indian restaurant, if not surpass it! It’s the perfect accompaniment to a wide array of savory dishes. Elevate your next meal by serving it with one of these truly tasty Indian recipes. If you appreciate the diverse world of Indian breads, I highly recommend trying my other beloved recipes: the super-soft roti, the layered and flaky South Indian paratha recipe, and the tender soft chapati recipe.
What is Butter Naan Made Of? Essential Ingredients for Perfect Naan
Guys, preparing the best naan of your life is surprisingly simple, relying on a magical blend of common pantry staples. This recipe harnesses the power of not just flour and yeast, but also a clever combination of baking soda and baking powder. When these dry ingredients are combined with the richness of yogurt to form a soft, pliable dough, you unlock the secret to unbelievably fluffy, flavorful naan.
Key Naan Ingredients & Their Roles
- All-Purpose White Flour (Maida in India): This forms the primary structure of our naan. All-purpose flour provides the ideal balance of gluten for a soft yet chewy texture. While some traditional recipes might include a small amount of whole wheat flour (atta), sticking primarily to white flour ensures the signature softness and elasticity that naan is known for.
- Instant Dry Yeast (Quick Rise Yeast): This leavening agent is crucial for the naan’s characteristic rise and airy texture. Instant yeast is wonderfully convenient because it can be added directly to your dry ingredients without prior activation. If you’re using traditional active dry yeast, remember to activate it first in a portion of the warm water with a pinch of sugar until frothy, typically for 5-10 minutes, before combining with the other ingredients.
- Baking Soda: While not universally found in all traditional naan recipes, baking soda plays a vital role in this recipe. It actively contributes to the formation of abundant bubbles, resulting in a lighter, airier naan. Additionally, baking soda helps to decrease the dough’s acidity, which in turn promotes superior browning in the pan, leading to more flavorful and visually appealing charred spots. A teaspoon and a half of baking powder can be used as a substitute if you don’t have baking soda, and you’ll still get extra bubbles, though the browning might be slightly less pronounced.
- Baking Powder: This ingredient acts as a fantastic ‘bubble insurance’ for your naan. Unlike baking soda, which begins to react immediately upon contact with acidic ingredients like yogurt and can lose some leavening power as the dough rests, baking powder is double-acting. This means it has an initial reaction when combined with liquid, and a second, more powerful reaction when heat is applied during cooking. This dual action ensures consistent puffing and a beautifully aerated interior.
- Plain Yogurt (Curd in India): The yogurt is a game-changer for soft, tender naan. It adds moisture, richness, and a subtle tang that enhances the overall flavor. Crucially, opt for regular **whole milk (3.25%) or 2% plain yogurt**. Avoid extra high-fat or Greek yogurt, as their excessive fat content and thickness can make the dough too rich and heavy, potentially preventing the naan from puffing up adequately and resulting in a denser, doughier texture. Buttermilk also works perfectly as a substitute, yielding similarly excellent results.
- Warm Water: The right temperature of warm water is essential for activating the yeast without killing it. Aim for a temperature between 120°–130°F (49°–54°C). This ensures optimal yeast activity for a good rise.
- Melted Butter: This is what truly elevates it to **Butter Naan**! It’s simply brushed generously onto the warm naan breads immediately after they finish cooking and are transferred from the pan. Salted butter is highly recommended for the best flavor, adding a delightful savory note to each bite.
- Minced Cilantro: Completely optional, but a sprinkle of fresh minced cilantro adds a beautiful pop of vibrant green color and a fresh, aromatic finish. For a more pronounced flavor, you could also add a couple of finely minced fresh garlic cloves to the melted butter, either alongside or instead of the cilantro, to create a delicious garlic butter naan.
- Kosher Salt: Essential for balancing flavors and aiding in gluten development.
How to Make Butter Naan: Step-by-Step Guide to Fluffy Perfection
Get ready to create soft, fluffy butter naan that tastes like it’s straight from your favorite Indian restaurant. I’ll guide you through each stage with detailed steps and tips, making the process enjoyable and foolproof.
How to Make Naan Dough: The Foundation of Flavor
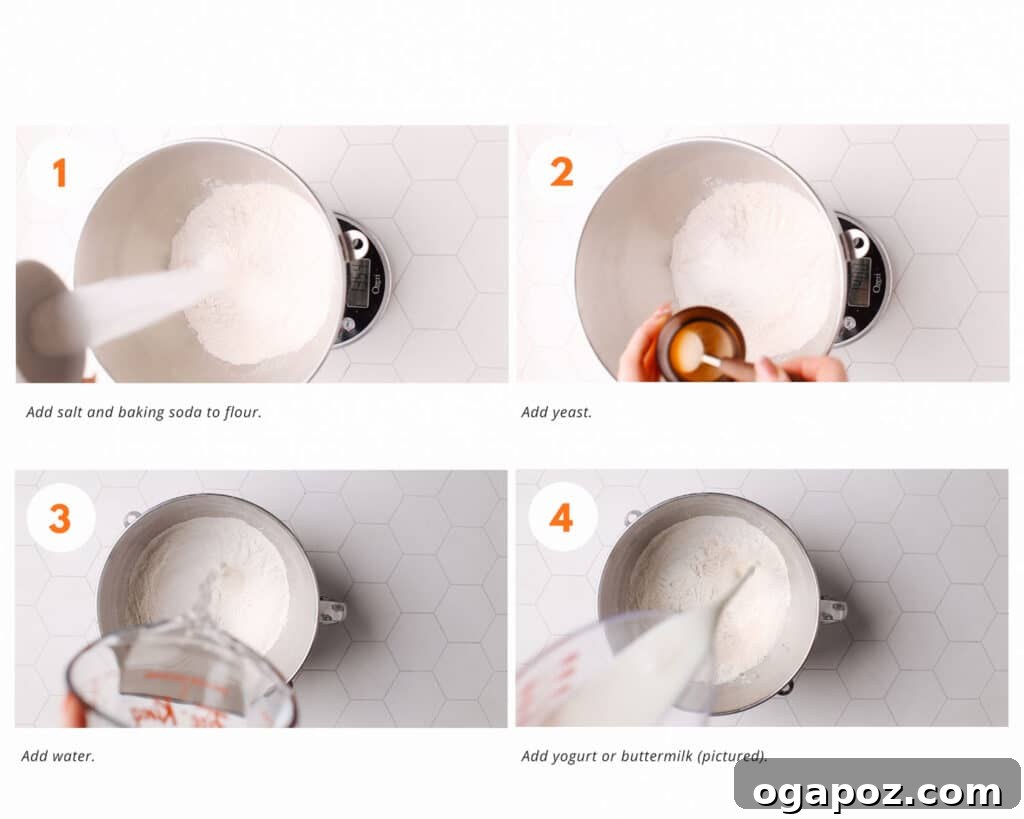
Begin by combining all-purpose flour, instant dry yeast, kosher salt, baking soda, and baking powder in the bowl of a stand mixer. Mix these dry ingredients on low speed. Then, gradually add the plain yogurt (or buttermilk) and warm water. Continue mixing until a shaggy dough forms, then switch to a dough hook attachment and knead for about 4 minutes on medium-low speed. The dough will be quite sticky initially, but resist the urge to add too much extra flour at this stage; it will come together as it kneads. For best results, ensure your warm water is between 120°–130°F (49°–54°C) to perfectly activate the yeast.
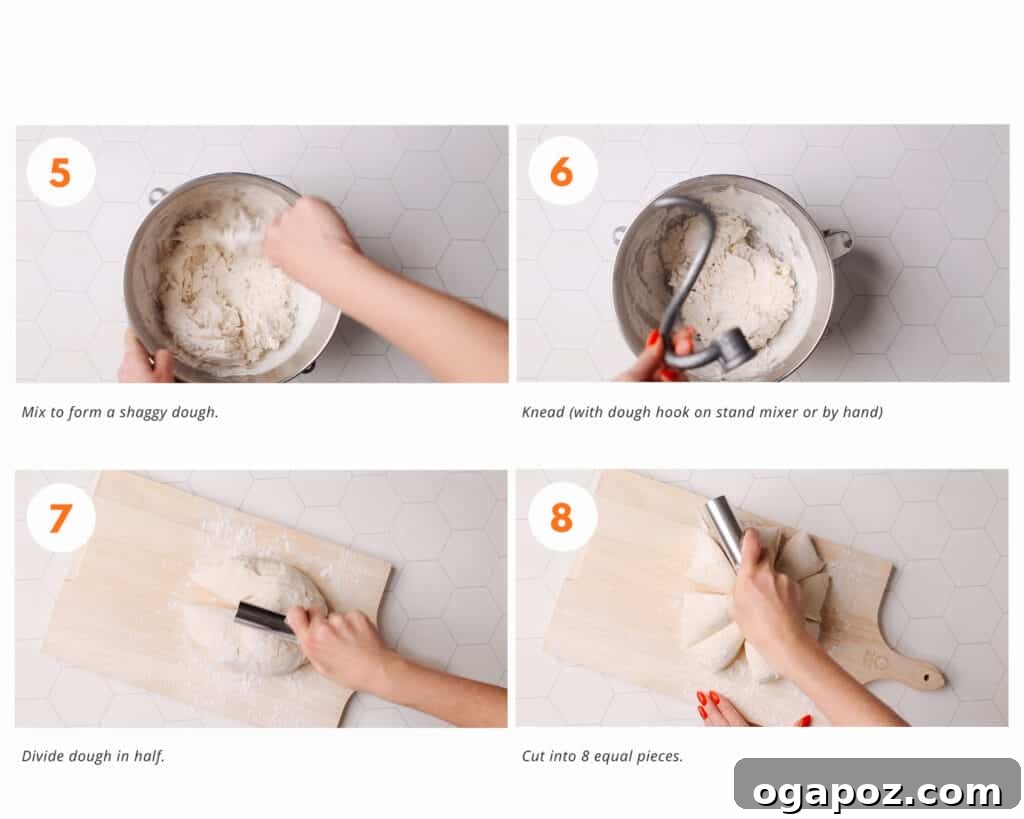
Once kneaded, turn the dough out onto a generously floured work surface. Briefly knead it once or twice by hand to form a large, cohesive ball. Divide the dough into eight equal pieces, then gently roll each piece into a smooth ball between your hands. Because the dough is designed to be soft and slightly sticky for maximum tenderness, you might find it helpful to lightly dampen your hands with water. Arrange these dough balls on a parchment-paper-lined plate, drizzle them with a bit of oil, ensuring they are fully coated to prevent sticking and drying out. Cover them with another sheet of parchment paper or a clean kitchen towel and let them rise in a warm spot for about one hour. This crucial resting period allows the yeast to work its magic, developing air pockets and a wonderfully soft texture.
How to Shape Naan: Crafting the Perfect Flatbread
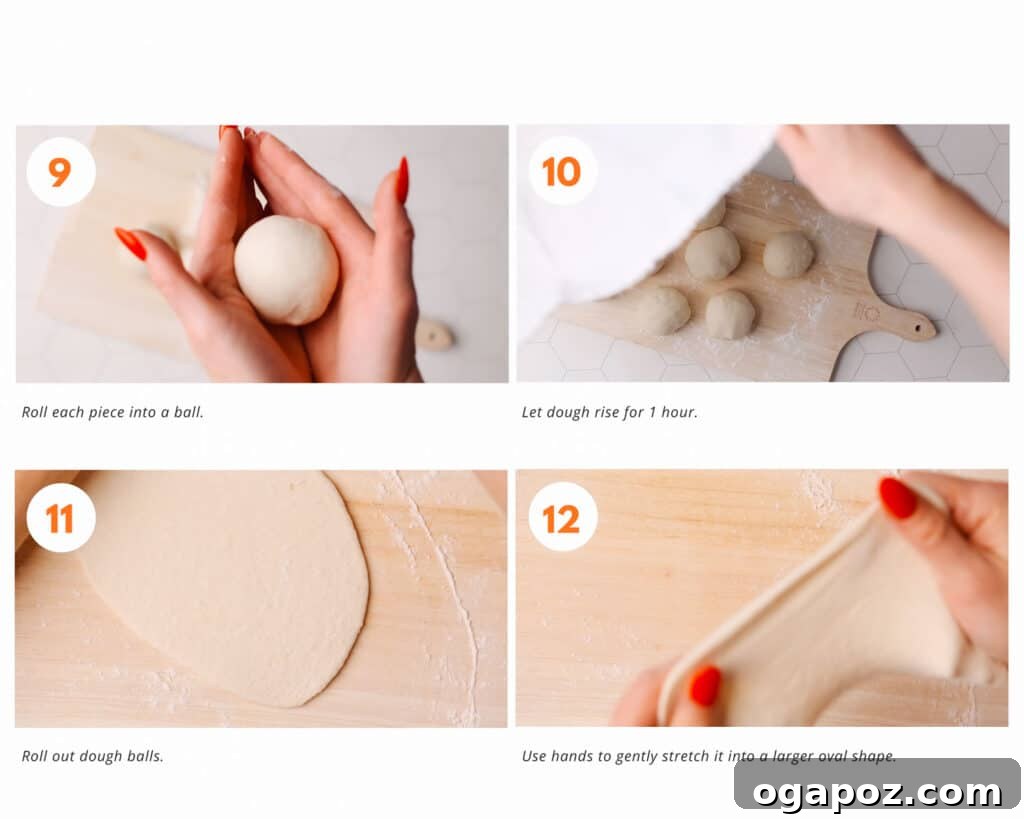
After the dough has risen beautifully, it’s time to shape your naan. On a lightly floured surface, take one dough ball and use a rolling pin to roll it out into an oblong or oval shape, aiming for a thickness of about ¼ inch, or even slightly thinner. Don’t worry about perfect uniformity; the rustic, irregular shapes are part of naan’s charm. Lightly flour the dough and your rolling pin as needed to prevent sticking. Once rolled, gently lift the dough off the counter and use your hands to carefully stretch and pull it into a slightly thinner, more elongated oval. This hand-stretching technique contributes to its characteristic chewiness. Arrange the shaped naan pieces in a single layer, ensuring they don’t overlap, and let them rest for another 10 minutes. This second brief rest is essential; it allows the gluten to relax, which prevents the naan from shrinking excessively during cooking and helps it puff up beautifully.
How to Cook Naan: Achieving Those Irresistible Puffs and Charred Spots
Now for the exciting part: cooking! Preheat a cast iron skillet (or a heavy-bottomed non-stick pan) on medium-high heat for at least 5 minutes. The pan needs to be scorching hot to achieve those signature bubbles and charred spots. You’ll know it’s ready when a sprinkle of water immediately beads up and evaporates. Add one naan to the preheated pan. Immediately cover the pan with a lid to trap the steam. Cook for about 30-60 seconds, or until you see large bubbles beginning to form on the surface of the naan.
Next, flip the naan to the other side. Cook uncovered for another 30 seconds or so, until the dough loses its raw, shiny appearance and develops delicious charred spots. For an even more dramatic puff and authentic tandoori vibe, especially if you have a gas stove, finish the naan over an open flame (refer to the “Pro Tips” section for detailed instructions). As each naan bread is cooked, transfer it to a plate and cover it with a clean kitchen towel to keep it warm and soft while you cook the remaining pieces.
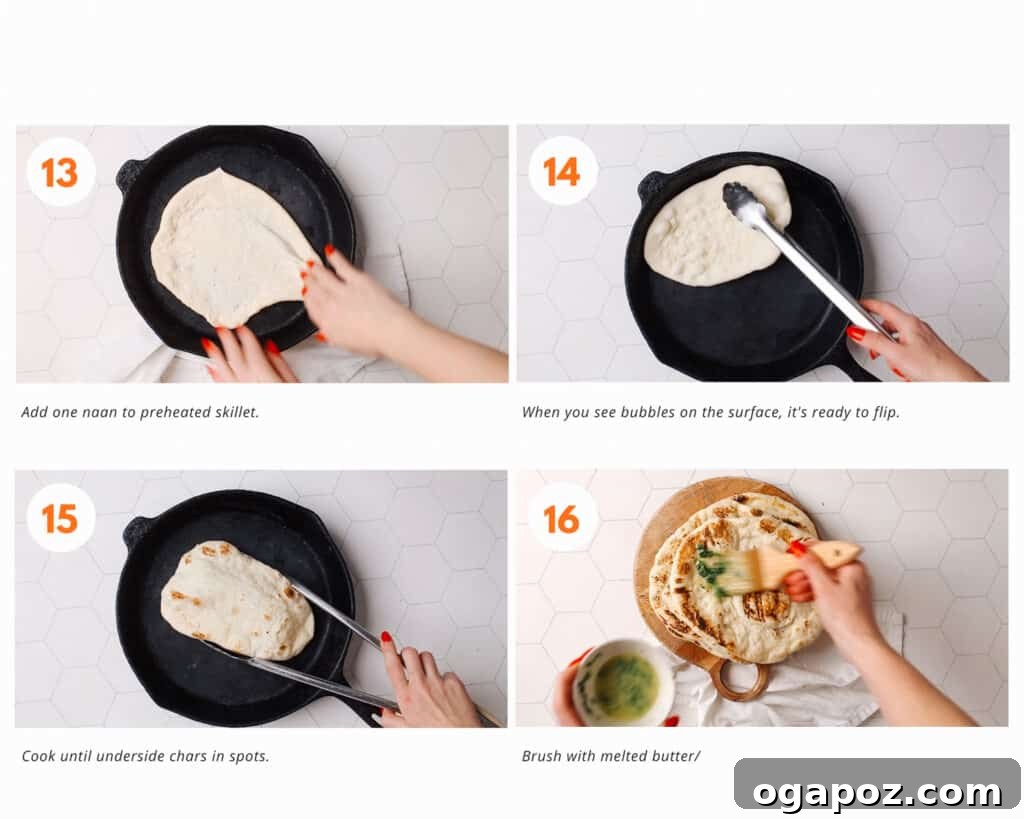
As a final flourish, and while the naan is still piping hot, generously brush it with melted butter. For an extra touch of freshness and color, stir in some minced cilantro into the butter beforehand. This butter application isn’t just for flavor; it also helps to seal the moisture into the hot bread, ensuring it remains wonderfully soft and pliable. The aroma alone is enough to make your mouth water!
If you’re feeling EXTRA fancy and adventurous, explore other delicious stuffed naan variations. Try my mouthwatering Keema Naan (stuffed with richly seasoned minced meat), Aloo Naan (filled with a savory potato samosa mixture), or the universally adored Cheese Naan (which is obsessively good with both Indian curries AND Italian pasta dishes!).
This recipe is easy, foolproof, and crazy good, promising a delightful culinary experience. Plus, I’ve included detailed tips below if you wish to prepare the dough ahead of time, making meal prep a breeze!
Notes and Pro Tips for the BEST Butter Naan
Achieving restaurant-quality naan at home is simple with these expert tips and tricks:
- Perfect Water Temperature for Yeast: To ensure your yeast is happy and active, always check your water temperature. I recommend boiling a kettle and adding about ½ cup of hot water to a measuring cup, then topping it off with cold water until it reaches the ideal temperature. For quick (rapid rise) yeast, the optimal water temperature range is between 120°–130°F (49°–54°C), according to Fleischmann’s yeast guidelines. Water that is too hot will kill the yeast, while water that is too cold will hinder its activation and slow down the rising process significantly.
- Embrace the Stickiness: It’s important to remember that the dough is *supposed* to be very sticky after kneading. This high hydration is key to achieving that incredibly soft and pliable texture in the final naan. Don’t be tempted to add too much extra flour during kneading. To handle sticky dough effectively, wet your hands with water or oil them lightly. When transferring to your work surface, flour it generously. For the dough balls themselves, drizzle a bit of oil and roll them around to coat both top and bottom before their rise. If, after following these steps, the dough is truly unmanageable, gently knead in a *small* amount of additional flour, one tablespoon at a time. If you do add more flour, ensure you allow the dough to rest for the full 1 hour to let the gluten relax.
- The Importance of Resting Time: The 1-hour rise time is not just for getting the dough bubbly; it is absolutely crucial for making your naan incredibly soft and tender. When you knead the dough (either by hand or with a stand mixer), you develop the gluten, which creates a very tight, elastic, and bouncy texture. If the dough isn’t given adequate time to rest and relax, it will resist rolling out, shrinking back dramatically, and you’ll end up with hard, dense, small flatbreads instead of lovely, tender, and easily stretched ones.
- The Gas Stove Secret: Direct Flame Finish: If you are fortunate enough to have a gas stove, you can take your homemade naan to an even higher level of authenticity, mimicking the tandoori effect. After flipping the naan on the skillet, cook the underside for just 5-10 seconds – just enough to seal the surface so it’s no longer sticky. Then, using tongs, carefully transfer the naan directly over a lit burner with the flame on high. Watch closely as the naan will puff up dramatically, and beautiful, authentic charred spots will appear within seconds. This technique adds an incredible smoky flavor and texture. Never walk away or multitask during this step, as the naan can burn very quickly!
- Avoid Oil or Butter in the Pan: When cooking naan, there’s no need to add any oil or butter to your cast iron skillet. As long as the pan is properly preheated to a high temperature, the dough will not stick. The dry heat is what creates those desirable bubbles and char marks.
- Rest Dough After Rolling: After you roll out and gently stretch your naan dough, let the shaped pieces rest for an additional 10 minutes in a single layer before cooking. This brief rest is vital because working the dough (rolling and stretching) tightens the gluten again. Allowing it to relax ensures the dough remains soft enough to stretch upwards as the moisture turns to steam during cooking, resulting in those wonderful internal air pockets and an overall softer texture.
- Troubleshooting Pan Temperature: As you cook multiple naans, your pan may become excessively hot. If you notice the naan starting to char on the bottom *before* bubbles begin to form on the top, turn down the heat for a minute or two before adding the next piece. This adjustment will prevent burning and allow for proper puffing.
- Precise Flour Measurement: For consistent and accurate results, especially with baking, I highly recommend using a kitchen scale to weigh your flour. Measuring flour by volume (cups) can be inaccurate, as flour compacts easily, leading to varying amounts and potentially altering the dough consistency. Weighing ensures you have the exact amount needed.
- Hand-Mixing Option: No stand mixer? No problem! You can easily make this butter naan dough by hand. Simply stir together all the dry ingredients in a large bowl. Then add the yogurt and water and mix with a wooden spoon until a shaggy dough forms. Turn the dough out onto a clean, lightly floured work surface and knead by hand for about 10 minutes until a smooth, elastic dough is formed.
How to Make Naan Dough in Advance: Perfect for Meal Prep
Preparing naan dough in advance is a fantastic way to streamline your cooking process and enjoy fresh naan whenever the craving strikes. You can easily store the dough in the refrigerator or even the freezer.
Regardless of the storage method, I highly recommend storing the dough as individual balls rather than one large mass in a stand mixer bowl. This approach significantly reduces the amount of work you’ll need to do just before cooking, resulting in softer, more tender naan because the dough is handled less.
To Refrigerate Naan Dough:
- Preparation: Follow the recipe instructions up to the point of forming the dough balls. Once shaped, arrange the dough balls on a parchment-paper-lined plate. Drizzle them with a small amount of oil and gently turn them to ensure they are fully coated. This oil barrier is crucial for preventing the dough from sticking together and from drying out on the surface.
- Storage: Cover the plate tightly with plastic wrap or transfer the oiled dough balls into an airtight container. Refrigerate for up to 4 days.
- Rising: You can skip the initial 1-hour rise at room temperature, as the dough will slowly rise in the fridge over time, achieving a similar result.
- Before Cooking: Prior to rolling and cooking, allow the refrigerated dough balls to warm back up to room temperature. This usually takes about 30-60 minutes, depending on your kitchen’s ambient temperature. Room temperature dough is much easier to roll and cooks more evenly.
NOTE: I do not recommend rolling out the dough into its final shape in advance and storing the flattened raw dough. As a sticky mixture, it can be quite challenging to lift flattened dough off of parchment paper without distorting its shape, which would be frustrating after all your hard work.
To Freeze Naan Dough:
- Preparation: Again, prepare the recipe up to the stage of forming the dough balls. Line a baking sheet or plate with parchment paper, drizzle the dough balls with a bit of oil, and roll them around to coat fully.
- Freezing: Skip the 1-hour room temperature rise. Freeze the oiled dough balls, uncovered, in a single layer on the prepared baking sheet until they are completely solid. This prevents them from sticking together.
- Long-term Storage: Once frozen solid, transfer the dough balls to a freezer-safe bag or an airtight container. You can keep the dough frozen for up to 3 months.
- Thawing: To use, thaw the frozen dough balls either in the refrigerator overnight or at room temperature for a few hours. To prevent them from sticking to the container or bag during thawing, it’s best to transfer them back to an oiled sheet of parchment paper and cover them loosely with another sheet of parchment before covering with a clean towel or plastic wrap. Allow them to come to room temperature before rolling and cooking.
How to Store Cooked Naan
Proper storage ensures your delicious homemade naan stays fresh for as long as possible:
- Short-term Storage: Store leftover cooked naan in an airtight container or a sealed zipper bag at room temperature for up to 1 day. This helps maintain its softness and prevents it from drying out.
- Avoid the Fridge! It’s crucial to avoid storing cooked naan in the refrigerator. The cool temperatures of the fridge actually accelerate the staling process in baked goods, causing your beautifully soft naan to become hard and dry quickly.
- Freezing Cooked Naan: If you don’t plan to consume your leftover naan within a day, freezing is the best option. To freeze cooked naan, allow it to cool completely after cooking. Then, pack the pieces into an airtight container or freezer bag, separating each layer with parchment or wax paper to prevent them from sticking together. Freeze for up to 3 months.
Related: Naan Pizza (an excellent, quick, and delicious way to use up leftover naan!)
How to Reheat Naan for Fresh-Like Results
Reheating naan properly is key to restoring its fresh-baked taste and texture:
- Individual Pieces (Quick Reheat):
- Pan or Skillet: Reheat naan one at a time in a dry, hot pan or cast iron skillet over medium heat for about 30-60 seconds per side, until warmed through and pliable.
- Direct Stove Flame (Gas Stove Only): For a truly authentic touch, use tongs to hold a piece of naan directly over a low-medium gas flame, turning frequently, for about 15-30 seconds until warm and slightly puffed. Watch carefully to prevent burning.
- Toaster: You can even cut naan in half and reheat it in a toaster for about 20-30 seconds for a quick warm-up.
- Bulk Reheating (Oven Method): If you need to reheat several pieces of naan, wrap them tightly in aluminum foil to retain moisture. Bake at 350ºF (175ºC) for about 8-12 minutes, or until the naan is warm and soft again.
FAQs About Butter Naan
Just breezing through? Here are the answers to some frequently asked questions about delicious Butter Naan:
Butter naan is a rich, flavorful, and incredibly soft leavened Indian flatbread, traditionally cooked in a tandoor-style fashion and then generously brushed with melted butter. It boasts a slightly yeasty and tangy bread flavor from the yogurt, complemented beautifully by the creamy, savory notes of butter. When freshly made, it’s delightfully chewy with a tender crumb, often featuring delightful charred spots that add a subtle smoky depth.
YES, absolutely! Naan bread is indeed a type of leavened bread. It is made from flour, yeast (or other leavening agents like baking soda/powder), water, and typically yogurt, which are combined to form a soft dough. This dough is then rolled flat and cooked, traditionally in a tandoor or on a hot griddle, to create its characteristic soft and pliable texture.
Naan bread is predominantly made from all-purpose white flour, which is known as ‘maida’ in India. While some recipes might incorporate a small proportion of whole wheat flour (atta) for added nutrition or texture, using primarily all-purpose flour is key to achieving naan’s signature soft, pliable, and airy consistency. Naan made entirely from whole wheat flour would typically result in a much drier and denser flatbread. I highly recommend sticking to all-purpose flour for this recipe, though you could experiment with substituting ½ cup to 1 cup of whole wheat flour for an equivalent amount of all-purpose flour if you desire a slightly heartier naan.
Naan is traditionally eaten with your hands, acting as an edible utensil. The customary way is to tear off a piece of the naan bread and use it to scoop up or pinch bites of curry, gravies, vegetables, or whatever delicious dish you are enjoying it with. Its soft, absorbent nature makes it perfect for soaking up rich sauces and flavors.
Naan is traditionally baked in a tandoor, which is a cylindrical clay oven used in many South Asian and Central Asian cuisines. A tandoor reaches extremely high temperatures, cooking the naan quickly and giving it its distinctive puffed texture and characteristic charred spots. For home cooks, a scorching hot cast iron pan (or tawa) works as an excellent and highly effective substitute, providing authentic tandoori-style results, especially when paired with this tested-till-perfect recipe.
Some naan recipes do include milk and/or egg to enrich the dough. However, through extensive testing, I discovered that this simpler recipe, which relies solely on yogurt and water for its liquid content, yields the most superior dough texture. It produces super soft naan that still puffs beautifully. Adding richer ingredients like excessive oil, milk, or egg can often lead to a denser naan bread, similar to what you might find pre-packaged in a grocery store (thicker, drier, with minimal bubbles). For a truly traditional, wonderfully soft, and airy homemade naan like this one, keeping the ingredient list focused on yogurt and yeast provides optimal results.
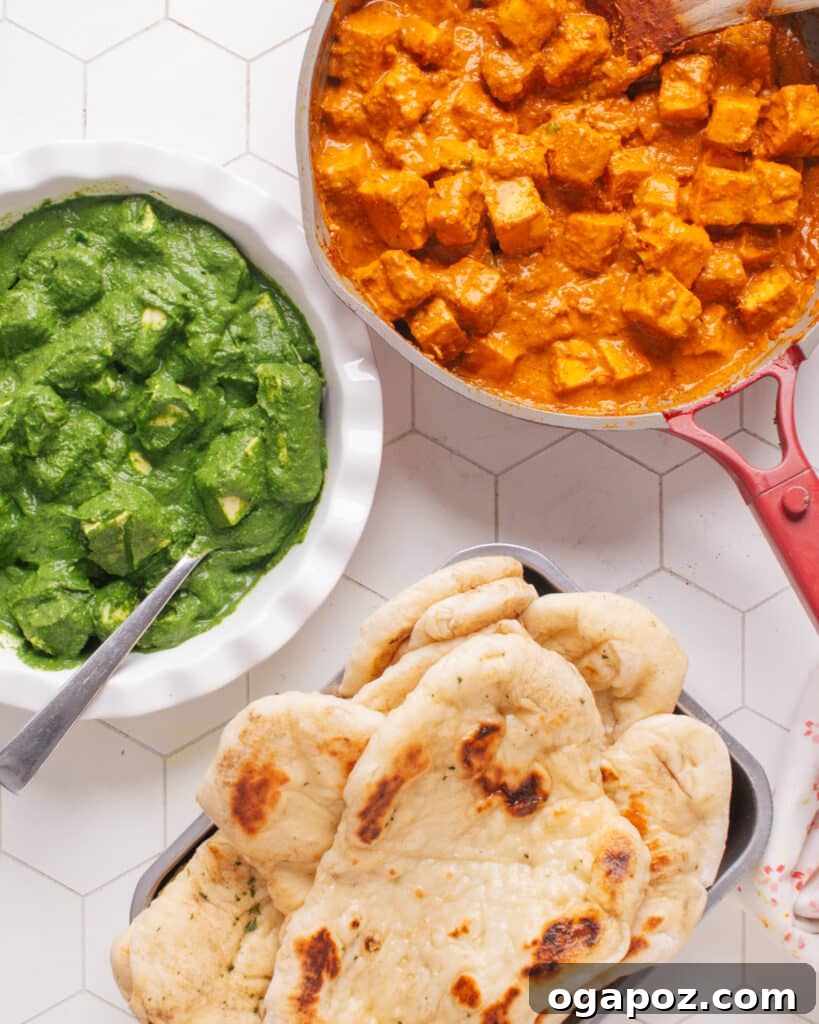
What to Serve with Naan Bread: Perfect Pairings
Naan and curry: an iconic and inseparable combination! This versatile Indian flatbread is the ultimate companion for a wide array of flavorful dishes. Its soft, absorbent texture is perfect for scooping up rich sauces and savory morsels. Elevate your next Indian feast by pairing your homemade naan with any of these fan-favorite, authentically flavored Indian dinner recipes, all tested to perfection:
- The Best Butter Chicken: A creamy, rich, and slightly sweet curry that is universally loved and truly deserving of its “best” title. Its velvety sauce is simply divine with warm naan.
- Chicken Korma: My Indian husband, Adarsh, often proclaims this as the best curry I’ve ever made. This mild yet intensely flavorful dish, with its luscious, nutty sauce, is an absolute delight alongside fluffy naan.
- Madras Lentils: A wonderfully creamy, hearty, and satisfying lentil dish that’s not only delicious but also incredibly quick to prepare. It’s a fantastic vegetarian option that pairs beautifully with naan.
- Coconut Curry Chicken: Another easy, lightning-fast, and incredibly creamy recipe packed with exquisite flavors. The subtle sweetness of coconut complements the savory naan wonderfully.
- Beyond Curries: Naan isn’t just for Indian food! It’s a surprisingly versatile flatbread that can be served with various Mediterranean dips like hummus, used as a base for quick pizzas, or even enjoyed simply torn and dipped in olive oil and balsamic vinegar.
To truly impress your friends and family, consider serving up some crispy, golden homemade chicken samosas on the side – the perfect appetizer to complement your fresh naan.
If you happen to have any leftover naan (though I doubt you will!), whip up a batch of this vibrant 5-minute Indian Chickpea Salad for a quick and satisfying lunch; you’ll absolutely love it. And once your naan cravings are fully satisfied, why not explore other global flatbreads? Try my soft and fluffy Turkish Bread next for another delightful baking adventure!

Pin Recipe
Print Recipe
Best Butter Naan Recipe
Video
A video tutorial for making this recipe would be embedded here.
Ingredients
- 4 cups all-purpose flour
- 1 tbsp instant dry yeast
- 2 tsp kosher salt
- ½ tsp baking soda
- 1 tsp baking powder
- ¾ cup plain yogurt or buttermilk
- 1 cup warm water see note
- 4 tbsp butter melted
- 1 tbsp minced cilantro
Instructions
-
Combine flour, yeast, salt, baking soda, and baking powder in a stand mixer fitted with the paddle attachment and beat on low speed to thoroughly combine.
-
Add yogurt and warm water to the mixer bowl. Starting on low speed, beat until the mixture forms a shaggy dough, then switch to the dough hook attachment and knead for 4 minutes on medium-low speed. The dough may appear very sticky at first but will come together as it kneads. Avoid adding more flour unless absolutely necessary (see notes).
-
Generously flour a clean work surface. Carefully dump the sticky dough out and sprinkle it with a bit more flour. Knead once or twice by hand to form a large, cohesive ball. Cut the dough into 8 equal pieces, then gently roll each piece into a smooth ball between your hands.
The dough will still be quite sticky at this point, which is normal for tender naan. Dampen your hands with a little water or oil them to make handling easier. If the dough is impossibly sticky, you may gently knead in a tiny bit more flour, one tablespoon at a time.
Lightly oil a sheet of parchment paper. Place the dough balls on top and roll them around to coat fully with oil. Cover with another sheet of parchment paper or a clean kitchen towel and let them rise in a warm place for 1 hour. (Refer to the “Make Naan Dough in Advance” section for guidance on refrigerating or freezing dough).
-
Flour your work surface again. Use a rolling pin to roll each dough ball flat to about ¼” thick, or slightly thinner, aiming for an oblong or oval shape. Lightly flour the dough as needed to prevent sticking.
Carefully lift the dough off the counter and use your hands to gently pull and stretch it into a thinner, slightly elongated shape. Place the shaped naan in a single layer (without overlapping) and let it rest for 10 minutes. This helps the gluten relax for a better puff.
-
Meanwhile, preheat a heavy cast iron pan (or a tawa) for 5 minutes on medium-high heat. The pan must be very hot. Test by sprinkling with water – it should bead and evaporate immediately.
-
Carefully place one naan onto the preheated dry pan. Immediately cover the pan with a lid and cook until bubbles begin to grow and appear prominently on the top surface of the naan (this usually takes about 30-60 seconds).
-
Flip the naan over and cook on the other side, uncovered, until the dough loses its shiny, raw look and starts to develop lovely charred spots (approximately 30 seconds more). For more dramatic puffing and charring, similar to authentic tandoori-style naan, **refer to the detailed notes below for instructions on finishing the naan over a direct gas flame.**
-
As each naan bread is cooked, transfer it immediately to a plate and cover it with a clean kitchen towel. This helps to keep the naan warm and soft while you cook the remaining pieces.
-
In a small bowl, melt the butter. Stir in the minced cilantro, if you are using it. Immediately and generously brush the melted butter mixture over the warm naan breads. This step not only adds incredible flavor but also seals the moisture into the hot bread, ensuring maximum softness and deliciousness.
Notes
Note on measuring flour: If you own akitchen scale, please use it to weigh your flour. It’s always more accurate than using volume-based measuring cups, where flour can compact down and give you too much.
Hand-mixing option: If you don’t have a stand mixer, you can easily make butter naan by hand. Stir together the dry ingredients in a bowl. Add the yogurt and water and stir with a wooden spoon to form a shaggy dough, then turn it out onto a clean, floured work surface and knead by hand until a smooth dough forms (about 10 minutes).
Direct flame variation (Gas Stove Only): If you have a gas stove, you can make the naan even more like authentic tandoori naan. This is my preferred method. After you flip the naan over, cook the underside for only 5-10 seconds to seal the surface so it is no longer sticky. Then use tongs to carefully move the naan over to a lit burner with the flame on high heat.
Place the naan (still second side facing down) directly on the grate with the flame beneath it. The naan will often puff dramatically. Cook until charred spots appear on the underside (it only takes seconds), then transfer it to a plate and cover with a towel to keep warm. Never walk away or multitask during this part, as the naan can burn quickly.
How hot should the water be? The ideal range is 120°–130°F (49°–54°C). Warmer and it will kill the yeast. Colder and the dough will be slower to rise.
As you’re cooking, the pan may get too hot. If naan starts to char on the bottom before bubbles form, turn the heat down for a minute before proceeding with the next one.
NO oil or butter should be used in the pan. As long as the pan is properly preheated, the dough will never stick.
Let the dough rest for 10 minutes after rolling to ensure bubbles. If you don’t, the gluten will be tight again from just working it. The dough will shrink in the pan and won’t have the soft texture needed to stretch upwards as the moisture turns to steam.
Nutrition
Carbohydrates: 45g |
Protein: 7g |
Fat: 8g |
Saturated Fat: 4g |
Polyunsaturated Fat: 1g |
Monounsaturated Fat: 2g |
Trans Fat: 0.2g |
Cholesterol: 17mg |
Sodium: 702mg |
Potassium: 26mg |
Fiber: 6g |
Sugar: 3g |
Vitamin A: 194IU |
Vitamin C: 0.1mg |
Calcium: 61mg |
Iron: 2mg
Nutrition information is automatically calculated, so should only be used as an approximation.
Tried this recipe? Leave a comment!